Your TMA Officers and Board of Directors
Support the TMA! ~ Traditional Muzzleloaders ~ The TMA is here for YOU!
*** JOIN in on the TMA 2024 POSTAL MATCH *** it's FREE for ALL !

For TMA related products, please check out the new TMA Store !

The Flintlock Paper

*** Folk Firearms Collective Videos ***


Author Topic: Round ball mould  (Read 848 times)

Offline greyhunter

  • TMA Forum Member
  • ***
  • Posts: 1491
  • TMA Member: Membership #291, Expires 2/11/2019
Round ball mould
« on: December 13, 2009, 11:28:24 AM »
I have a Dixie Gun works rb mold that is of the scissors type, anyone familiar with these? Anyway my question is, I bought a similiar tool at a flea mkt, but.......... it is not milled out for a ball yet. This tool , as explained by Turner Kirkland (DG founder)was originally for staightening womens hair. He obtained a number of these and made them into rb molds. Does anyone in the TMA have the ability to mill this tool out to .530 rb size ? Turner Kirkland said something about making a cherry on his lathe and using it to mill these tools into rb molds ??? Anywho there it is my worthy bon amis. Your attention to this is appreciated . Regards GH. :bow
Pa. TMA State Representative.[/color]
Member#291  2/11/19

Offline R.M.

  • TMA Forum Member
  • ***
  • Posts: 810
  • TMA Member: 134
(No subject)
« Reply #1 on: December 13, 2009, 11:35:48 AM »
I've spent all my working years in a machine shop as a Tool and Die Maker, and let me tell you, I would not want to have to do that for a one of project. Making the two halves mate would be a royal pain. If you had hundreds to do, fixturing would speed things up, but for one, it would be cheaper to buy a finished mold by a long shot.
R.M.
 :Canada
TMA Charter Member #134   Exp. 11/14
Join the TMA. For the money, it's the best BOOM for your 15 bucks.

The tree of liberty must be watered periodically with the blood of tyrants and patriots alike..........Thomas Jefferson

Offline greyhunter

  • TMA Forum Member
  • ***
  • Posts: 1491
  • TMA Member: Membership #291, Expires 2/11/2019
DGW rb mold
« Reply #2 on: December 13, 2009, 02:11:10 PM »
Here is a picture of mold and blank. Don't know how Turner Kirkland did this but I guess he made a bunch from hair straightener blanks. He has put a locator pin in one side of mold and matching hole on the opposite face.  I wouldn't question anyone's expertise in the machine operator field, just hoped it would not be too difficult/expensive to mill this. I wonder how the old buck did this?  [albumimg:2wn1p7qr]4534[/albumimg:2wn1p7qr] :?
Pa. TMA State Representative.[/color]
Member#291  2/11/19

Offline Sir Michael

  • TMA Forum Member
  • ***
  • Posts: 2754
  • TMA: TMA Store
  • TMA Member: Charter Member #132
(No subject)
« Reply #3 on: December 13, 2009, 02:44:24 PM »
I have one for my 62.  I was not enamoured with the alinging pin which looked to flimsy at best and insufficient at worst.  I made a few balls with it but a regular modern RB mould works a lot better for making a production run.  

Your best bet would be to hit the tool shops for either a standard or production "cherry" cutter for use on a milling machine if you have one and really want to make your own.  If not I seem to remember someone on the Forum that has made moulds before.  He may be able to help you out.

I also have a brass bag mould I got Dixie and it is OK.  The alignment is not perfect (there is a slight belt around the middle on each ball) and there are ridges inside the cavity (not perfectly smooth).  But it is brass and looks cool. :|

If you are looking for a bag mould I can strongly recommend Rapine.  If you are looking for a production mould just about any modern single or double cavity RB mould will do although my preference is for those made of steel rather than aluminum. :rt th
Sir Michael
Charter Member #132

Offline greyhunter

  • TMA Forum Member
  • ***
  • Posts: 1491
  • TMA Member: Membership #291, Expires 2/11/2019
RB Mold
« Reply #4 on: December 13, 2009, 02:53:33 PM »
SM I have run ball for my cap and ball revolver with this mold, it's a .454 dia. The only issue is the large sprue I have to deal with. Otherwise it makes a good smooth ball every time. I will get a modern mold for my .54 in due time, just thought it was possible to get this blank milled out and pinned , But RM says it would be too expensive for just one mold.  Next question.............how where original ball molds made?  ;)
Pa. TMA State Representative.[/color]
Member#291  2/11/19

Offline Sir Michael

  • TMA Forum Member
  • ***
  • Posts: 2754
  • TMA: TMA Store
  • TMA Member: Charter Member #132
(No subject)
« Reply #5 on: December 13, 2009, 03:27:20 PM »
As for how original moulds were made, I'd have to say essentially the same way they are made today.

By 1822 the design of moulds incorporated an integral sprue cutter just as they do today.  This design was improved on by Ezekiel Baker as shown in this picture.

[albumimg:14gvkk38]4542[/albumimg:14gvkk38]
Ignore the box in the upper right corner it is for something else.

As you can see the basic design of what we today call a bag mould is the same as today complete with scissor sprue cutter.  Baker's innovation was to change the sprue cutter so that the ball is placed horizontally on a detent and the cutter mounted vertically and shaped to conform to the ball.  This left the surface where the sprue was cut off rounded with the same curve as the rest of the ball surface.

He also designed a separate sprue cutter for those that had moulds they liked and didn't want to purchase a whole new mould with the new cutter.

[albumimg:14gvkk38]4058[/albumimg:14gvkk38]

As with the design of the mould he has left the scissor cutter in place.

I would speculate that the final production design of his new mould and separate cutter eliminated the scissor cutter but I've never been able to find one of his moulds to confirm this.  Why I'm not sure.  He received a "Vulcan Silver Medal" from the British Society of Arts for the design.  It may be that it just never caught on to replace the scissor design.
Sir Michael
Charter Member #132

Offline greyhunter

  • TMA Forum Member
  • ***
  • Posts: 1491
  • TMA Member: Membership #291, Expires 2/11/2019
RB mold
« Reply #6 on: December 13, 2009, 03:46:17 PM »
"As for how original moulds were made, I'd have to say essentially the same way they are made today. " SM

 And how, may I ask are they made today? Not trying to be smart, just  curious!
Pa. TMA State Representative.[/color]
Member#291  2/11/19

Offline Sir Michael

  • TMA Forum Member
  • ***
  • Posts: 2754
  • TMA: TMA Store
  • TMA Member: Charter Member #132
(No subject)
« Reply #7 on: December 13, 2009, 06:27:14 PM »
I was going to post that but decided that would be like "trying to teach my grandmother how to suck eggs". :lol:

I have seen posts on the net about making the Milling Cherries I've also seen them for sale in a variety of sizes. I just went looking for one as an example but I can't seem to find one.   :cry:
Sir Michael
Charter Member #132

Offline bluelake

  • TMA Forum Member
  • ***
  • Posts: 213
    • http://www.shinmiyangyo.org
  • TMA Member: 424
  • Location: MI
(No subject)
« Reply #8 on: December 13, 2009, 07:56:22 PM »
Interesting thread--thanks!  I was thinking of a very similar subject just this morning, so the thread's timing couldn't have been better.  I have yet to find an example of a Korean Joseon dynasty (1392-1910) ball mold, but they certainly must have had them (I have an original ball, but not the mold).  It is a subject I plan to add into my dissertation.
Member #424

Offline greyhunter

  • TMA Forum Member
  • ***
  • Posts: 1491
  • TMA Member: Membership #291, Expires 2/11/2019
rb mould
« Reply #9 on: December 13, 2009, 08:26:14 PM »
They had milling machines in 1776? Guess I better do some research on the net.  I envision someone rolling a piece of lead into an appropriate ball size, then making a sand cast mold of same, then casting  a mold from the sand mold, then..................................yeesh. :shock: No wonder the smoothies were so popular, just load yer powder and drop a han full a nails down the tube. Thanks for the info lads. Regards GH.
Pa. TMA State Representative.[/color]
Member#291  2/11/19

Offline Three Hawks

  • TMA Forum Member
  • ***
  • Posts: 391
(No subject)
« Reply #10 on: December 13, 2009, 08:47:21 PM »
Turning a ball of a specific size is not too difficult with a ball turning jig in a lathe.   Then all that's needed is to make cutting edges in the surface of that ball (cherry) without making the remaining ball smaller.  It's easy, just as brain surgery, boatbuilding and wheelmaking is  easy.  After you've first learned it, then done it fifty or a  hundred times.

Turner Kirkland and Dixie, after he started it up, sold thousands and thousands of his ball and bullet molds over the years, they still do.

Unless you are a machinist with a lathe (not a milling machine) it will be much cheaper in the long run just to buy a mold the proper size.  As I said above, Dixie  sells their iron mold, their Italian made brass bag mold in a few sizes and Lee molds.   If you need or want a mold custom made, Jeff Tanner in England sells a dandy mold in whatever size you might want and they are not expensive.  As cheap as they are, I'd bet a week's wages he uses CNC machinery.  Rapine is also a good source.  

Three Hawks.
TMA #360
????? ?a??
Whatever doesn't kill me had better start running.

Offline Sir Michael

  • TMA Forum Member
  • ***
  • Posts: 2754
  • TMA: TMA Store
  • TMA Member: Charter Member #132
(No subject)
« Reply #11 on: December 14, 2009, 02:47:01 PM »
My description of the process was based on modern methods.  However, the original process during the 18th and 19th centuries was not much different as far as I can tell.  People are very surprised when they get to looking at 17th and 18 C. tools.  First, at how little they have changed since then and second, the quality of the tools.  Machining equipment was one the early developments of the industrial revolution.  Detailed hand work was still very much essential to the process but machines that did the heavy work or simple repetitive work were the key to the expansion.  Just look at the quality and intricacy of guns and other mechanical devices of the period and you can see capabilities you might not think they had the ability to pull off but they did.

One last thing to remember about making balls and firearms before the invention of cartridge guns is that balls were made on the basis of how many uniform spheres could be made from 1 (one) pound of lead, NOT NICE CONVENIENT DIAMETER MEASUREMENTS LIKE WE DO TODAY.  A recent find of mine, a book published in the U.S. in 1811 about military education states that rifles used by backwoods-men were unsuitable for military use since they used balls 40, 50, or even more per pound (that translates to .488, .453, or smaller in diameter).  It also recommends that military rifles should be between 25 and 30 balls per pound (.571 and .537)

Rifle and musket barrels were made to fit a specific size of ball not the other way around like we do today.  Also most guns smooth or rifled were sold with a bullet mould to make balls that fit it.  Even Trade Guns sold or traded to the indians of North America came with moulds.
Sir Michael
Charter Member #132

Offline Captchee

  • TMA Forum Member
  • ***
  • Posts: 6215
(No subject)
« Reply #12 on: December 14, 2009, 09:14:15 PM »
micheal is correct in his post
 did they have lathes . yep  ever seen a bow lathe or a wheel lathe ? ?

did every smith have a lathe , nope . but one basic tool was a brace and bit  and vice
 was all the moulds made for irone nope .  soap stone was also used

 i made my very first RB mould with just that , a brace and bit and a vice .
 the trick is to not  clamp the two haves so tight you cant turn it .

 with a centering block  the  cherry will not wobble either .  well any more then the wabble that you have made into it .

 you would also be surprised at just how fast a hardened cherry will cut into iron
 the neck of the cherry also become you spru  so you don’t want that to big . Just take the two haves down tell they start to touch the neck of the cherry .
 Remove the block from the clamp and  drill  that area out to the size of the neck of the cherry . Then put it back in the camp and start turning tell the two haves come together
 If you don’t want to make it the old way , just go down to a machine supply shop and get a Ball burr . Normaly they will have standard sizes on hand . So basicly ½ inc. .500 but you want a .530  so they should be able to order you one that size
deending on the quality of burr , your looking at 8.00-35.00
 
Or you can make your own .

 he is something for you
Quote
THE REVOLUTIONARY BLACKSMITH
by Jim Paw-Paw Wilson
Illustrated by Jock Dempsey and Walt Sherrill  


Book III Chapter 2
 

17 May 1777

Some people are so careless! One of the teamsters came to me looking a bit shame faced today. He has lost the bullet mold for his musket! I asked him if he had any musket balls left and he only had two. I made him give me one of them so I'd have a ball the right size to use for a guide.

I'll have to make a cherry so I can cut him a new bullet mold. I suppose while I'm at it, I might as well make a mold that will cast more than one ball at a time. I stopped by Master Longmire's wagon and explained what had happened and why I was making the repair so that he wouldn't think I was trying to take work away from him. Normally, it would be the guns smiths's job, but since it's one of my men, I'll do it for him.

And I think I'm coming down with some kind of sickness. My nose has been runny and I've been coughing for a couple of days now. I've had a bit of a fever too, I think. Cookie has been making me willow bark tea, I drink a cup every couple hours and it seems to help. At least I don't ache quite so much. But I'm rapidly learning to hate the taste of willow bark tea! Even with honey in it is doesn't taste very good!


21 May 1777

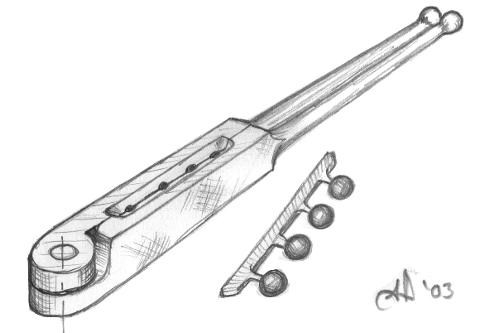
I got the bullet mold made. I took a piece of tire strap and folded it in half to make it thicker. After it was folded, I cut it two pieces and formed the half of a hinge on one end of each piece. On the end opposite the hinge, I forged a handle. Then I hinged them together.

Next I forge welded a piece of steel on the end of a piece of round stock. Then I forged the steel into a round ball. Tommy filed it down to the same size as the musket ball that I had gotten from the teamster. Then he filed a series of teeth into it almost like he was making a file. He also cut a few teeth on the shank just above the ball with a cold chisel so it will cut a sprue in addition to cutting the hole for the ball.

Once the ball was made, I shaped the rest of the rod into a crank handle and got a piece of maple from Rob to use for a palm pad. He shaped one side of the piece of maple to a nice curve and drilled a small hole in the center of the other side. Not very big, just a little bit bigger than the round stock that I used to make the cherry. I got some lard from Cookie to lubricate the palm pad.


Finally, I hardened the cherry by bringing it up to a nice red heat in the fire and quenching it in cold water.

Then I clamped the hinged bullet mold in the vise so that it was just a little tight on the cherry. Cranking the cherry around was pretty difficult at first, but once I got it started, it went fairly easily. When it had cut the sides of the mold till it was loose, Tom tightened the vise up just a tiny bit and I kept cranking. Each time the cherry got loose in the mold, Tom tightened it. When the two halves of the mold were almost touching, and the shank above the cherry had cut a groove, we took the mold out of the vise, opened it up, and cleaned out all of the little pieces of metal. Then we moved the cherry toward the handle so we could make a second cavity. The stock that I was working with was only long enough to cut four cavities.

When it was all cleaned up, I had Tom file the top edge of each half at an angle, till the edge of the file cut was right at the top of the ball, leaving a bit at each end so that the cut became a small trough for the lead to follow.

Finally, I forged a piece of small round stock into a clip that would fit over the handles of the mold to hold it closed.

Then we melted some lead and poured the first four musket balls. One of the holes was not quite big enough, the ball was a pretty loose fit, so we ground it out a little bit more.

The last step before we signed it was to drill two small holes at the handle end, and put a pin in both holes on one half of the mold. I just let a little bit of the pin stick out so that when the mold is closed the ends of the pins will fit into the holes in the other half of the mold. That way it will always close up in exactly the same position.


The last thing we did was put our touch marks on it. I put mine on one side, and Tom put his on the other side.

Whatever sickness I was coming down with seems to have gone away. I'm not coughing nearly as much, and my nose isn't running any more. I'm sure glad, because I was pretty miserable for a couple of days.


22 May 1777

Before I gave the bullet mold to the teamster, I decided to make a combination tool as well. If he lost his mold, he probably lost his combination tool. A combination tool isn't hard to make, it's just a piece of half inch square stock, folded into a shape like a letter T with one of the short arms being twice as thick as the other. The thin end is forged down into a tiny point to serve as a vent pick, the thick end is formed into a small hammer head to serve as a flint knapper, and the end of the long part is shaped into a tiny screw driver to use on the screws of the musket.

When I gave the mold and pick to my teamster, he was most appreciative. Especially since we had made it a four ball mold, most molds will only cast one or two balls at a time.


Offline greyhunter

  • TMA Forum Member
  • ***
  • Posts: 1491
  • TMA Member: Membership #291, Expires 2/11/2019
mould
« Reply #13 on: December 14, 2009, 09:38:20 PM »
Thanks Cap, now that's an explanation.  This blank mold has forged iron stamped on it, so I don't feel it to be too hard to work.  Anyway I am a patient man when it comes to making my own things. I have been a mechanic since 1967, licensed A&P mechanic, diesel mechanic in the service, and ran my own small engine repair shop for 21 years. I understand, fix it some how, make it some way, and I appreciate someone else's expertise in something I haven't done, yet. The first thing I will do with this is drill a locator pin thru both halves, then make a jig to hold the mold while I bring it into a cherry. I could buy a mold, but then you could buy a rifle too, instead of making one. Once again a lot of free information from the club members and fully appreciated by me.
Pa. TMA State Representative.[/color]
Member#291  2/11/19

Offline Captchee

  • TMA Forum Member
  • ***
  • Posts: 6215
(No subject)
« Reply #14 on: December 14, 2009, 09:55:59 PM »
here is an interesting
 link on the history of the lathe

http://www.woodworkinghistory.com/glossary_lathe.htm