Your TMA Officers and Board of Directors
Support the TMA! ~ Traditional Muzzleloaders ~ The TMA is here for YOU!
*** JOIN in on the TMA 2024 POSTAL MATCH *** it's FREE for ALL !

For TMA related products, please check out the new TMA Store !

The Flintlock Paper

*** Folk Firearms Collective Videos ***


Author Topic: Jacob Dickert Build Progress  (Read 42038 times)

Offline 4-Liberty

  • TMA Forum Member
  • ***
  • Posts: 169
Re: Jacob Dickert Build Progress
« Reply #120 on: January 03, 2015, 07:09:54 AM »
The TG is inletted and pinned! Although, it didn't go as smoothly as I had hoped. Lessons learned for next time.


The plug for the trigger plate turned out pretty decent.


The blown-out side from the pin was repaired, and I don't think it'll be too noticeable because the fractures seem to run with the grain of the stock. Once sanded and stained, it should be good. I did, however, have to re-drill the hole for the pin because, for whatever reason, it ended up crooked. I used a drill press with a point-to-point adapter, so I don't know what I did wrong there. So now, as you can see, I have a tiny, pin-sized hole to fill. Any suggestions on what to use to fill it?


Now that that is done, I guess I'm onto shaping the stock!
Stay tuned! :hairy
TMA Member #174

Offline Captchee

  • TMA Forum Member
  • ***
  • Posts: 6215
Re: Jacob Dickert Build Progress
« Reply #121 on: January 03, 2015, 09:33:58 AM »
your plug looks good .you going to inlet the front of the trigger guard or leave it flush ?
 as to your pin hole . i would leave it tell your down to the point your ready just to finish sand . then plug the hole   and re drill it . make the plug from the same wood you used for the trigger gaurd plug. Just trim the plug out of the side so you get matching grain . Also , make it alittle over size so you have to drive it in. . thus when you redrill , you get a full hole for your pin , not a larger hole with a little chip at the end that will break out the first time you have to remove the pin

Offline Twowithone

  • TMA Forum Member
  • ***
  • Posts: 8
Re: Jacob Dickert Build Progress
« Reply #122 on: January 04, 2015, 11:03:25 PM »
Great job keep up the good work

Offline Eric Krewson

  • TMA Forum Member
  • ***
  • Posts: 120
Re: Jacob Dickert Build Progress
« Reply #123 on: January 06, 2015, 10:38:38 AM »
I use 5/64 music wire for pins and have a piece of tapered stock wire about 3" long I cuck up in my drill and run through the drilled hole from both sides. This assures my pins won't chip out when I drive them in. I sometimes put a small drop of superglue in the end of the hole with a toothpick to strengthen the exit then re-drill for my pins.

Offline Hanshi

  • TMA Forum Member
  • ***
  • Posts: 948
    • http://www.martialartsusa.com
Re: Jacob Dickert Build Progress
« Reply #124 on: January 06, 2015, 05:38:33 PM »
Just can't help it!  I'M getting excited over your build. :happy
Young guys should hang out with old guys; old guys know stuff.

Offline 4-Liberty

  • TMA Forum Member
  • ***
  • Posts: 169
Re: Jacob Dickert Build Progress
« Reply #125 on: January 09, 2015, 03:31:42 PM »
Thank you, gentlemen!
Captchee, to answer your question, I do have the front of the TG inletted down a bit into the stock. Although, it may not appear that way when the TG is in position, the mortise is about 1/16-3/32" deep.
TMA Member #174

Offline 4-Liberty

  • TMA Forum Member
  • ***
  • Posts: 169
Re: Jacob Dickert Build Progress
« Reply #126 on: January 10, 2015, 07:35:19 AM »
I'm starting to work on the forestock upper portion where the stock meets the barrel.
I measured from the top flat of the barrel to the widest portion of the muzzle cap. I then transfered that measurement to the stock.


I then used a rasp to shave that portion of the wood away.


Here, you can see one side roughed in and the other side untouched.


Where the barrel meets the stock. Both sides are roughed in.


Now on to the lower portion of the forestock.
How should this area be shaped for this particular rifle? I've read it should be U-shaped, but I've seen photos of Lancasters being V-shaped. And how do I go about getting this shape?
TMA Member #174

Offline Captchee

  • TMA Forum Member
  • ***
  • Posts: 6215
Re: Jacob Dickert Build Progress
« Reply #127 on: January 10, 2015, 08:37:07 AM »
Well in so many words , just like you did on the top . Your distance though is going to be measured from the  side of the RR channel up to  either the line you just drew,  if you want a V or to a distance below the  line if your after  more of a U belly.
 Keep  in mind , this shaping does not carry all the way to the nose cap  .
  your nose cap design  defines the top of the forestock  down to about mid point of the cap . The cap also defines the shape of the stock for a distance behind the cap.
Depending on the rifle im building , I carry the nose cap shape back at least an inch  some times an inch and a half  before I transition into the  shaping to the RR channel  
 The pre carve stock for your rifle appears to have a very thick web between the barrel and the RR channel . As such you need to plan on  shapes and molding that will help give the perception of length,  and slimness  if your wanting a slim rifle . If your shooting for a more heavy frame  then you look at  shapes and molding that  do the opposite.

So at this point  my recommendation would be to shape the stock , behind the nose cap , for a short distance , to the shape of your nose cap .  This will help start the impression of slimness and  give the  impression of length. DON’T go to far back , keep at least a ½ inch  in front of your  front barrel pin .

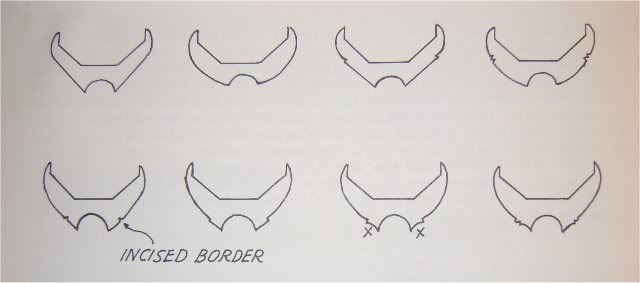
 Here are also some  different fore stock shapes   for you to consider . While you  looking at these  consider your moldings  and how they will relate to  your shape . IE will they be deep and in heavy or light  relief . ?
Will they be just incise lines  .?
Will you have a double row so that the shaping will come around from the barrel , drop into an incise line , then into a  concave molding , back to incise then around to the edge of the RR channel?  
  Maybe you might want no moldings with just a nice S sweep coming off the barrel down and out to the RR channel . Its really up to you . But you have to plan this out . Some molding work takes more wood  others take less .

Offline 4-Liberty

  • TMA Forum Member
  • ***
  • Posts: 169
Re: Jacob Dickert Build Progress
« Reply #128 on: January 11, 2015, 03:43:29 AM »
I really like the design in these two photos.


It appears to be a combination of all three of these: an incised border, a releifed border, and a flute next to the barrel channel.


Would you start roughing that in up to the line I drew for the top bevel as a V-shape, or would I draw a line under that line to make it more of a U-shape? I'm thinking the latter.

I hope I'm not tackeling something beyond my ability with this one! :shock:
TMA Member #174

Offline Captchee

  • TMA Forum Member
  • ***
  • Posts: 6215
Re: Jacob Dickert Build Progress
« Reply #129 on: January 11, 2015, 10:40:09 AM »
Myself , i do the later . IE come down alittle from your line   then  rasp  to the RR channel  thus leaving you  kind of a  flat  U / fat , rounded V and enough wood that you can make the S curve into the RR channel . Then come back and sand in your concave  boarder an bead . What you want to try and do is  get the shape down to where  itnot much higher then you highest carving .

As to being beyond your ability . I would say NO . it does however take alittle work . but respectfuly , your building a gun  and doing a very good job of it so far for your first attempt . you didnt shy away from that . i sure wouldnt from this .
 
 Once you have the  U  then come back from the RR channel  and lay out your concave boarder and bead .  Lay it out as one width .  You will come back later and  separate the two .  Just take a pencil and strait edge  or a compass  and draw it out so that its even on both sides of the RR channel .
 Once you have that  to your satisfaction , come back and start cutting on the upper relief .
 Myself I use a chisel  and plunge it into the wood , the full length of the line . Just don’t start off to deep  as you will want to work the wood above the plunge to the same shape as your nose cap, tapering and blending the shape so that as you get to the forearm  at the entry pipe  , both will blend together .

 Now for the concave  boarder , you need to make a sanding tool .  This is nothing more then 2 pieces of RR  about  6 inches long and attached at both ends by a bridge .
 The bridge can be nothing more then a  small piece of wood  screwed  or glued to one piece of RR .  The other piece of RR  need to be able to  be able to be adjusted . So  its screwed alongside  the first piece at  the distance you want to make  your concave start .
  What this little tool allows you  to do is sand in the concave boarder  using the RR channel as a guide . You simply take a piece of 80 grit sand paper , rap alittle around one  of the 6 inch pieces of RR. Set the other  side into the RR channel  and slide the tool up and down the channel .

 Now for the bead , you will either have to  cave and sand the as an incise or use a   beading tool  which can be purchased  through any place that sells gunstock checkering tools  . One could also make one . But at the price for buying just one tool …..

Offline 4-Liberty

  • TMA Forum Member
  • ***
  • Posts: 169
Re: Jacob Dickert Build Progress
« Reply #130 on: January 12, 2015, 12:46:13 PM »
Well, I'm continuing working on the forestock, and I have the area behind the muzzle-cap roughed in. I measured 1 1/4" back from the base of the muzzle-cap and taped it off with masking tape. I then under-cut around the tape and rasped down to the depth of the muzzle-cap.


I then scribed a line about 3/16" below my first bevel line. I also scribed a 1/8" line next to the ramrod channel to leave room for error, and then rasped a bevel between those lines.


One side finished.


TMA Member #174

Offline Captchee

  • TMA Forum Member
  • ***
  • Posts: 6215
Re: Jacob Dickert Build Progress
« Reply #131 on: January 13, 2015, 07:43:22 AM »
looks good

Offline 4-Liberty

  • TMA Forum Member
  • ***
  • Posts: 169
Re: Jacob Dickert Build Progress
« Reply #132 on: January 21, 2015, 01:43:05 AM »
Shaping where the stock meets the barrel.


Sanding down the rough bevels to more of a U-shaped belly.


I have the basic shape I'm looking for.


This is how I scribed a line down the side of the forestock for my molding.


It worked pretty good. I went back and plunged a chisel into the full length of the line.


Then I just relieved the wood up to that line.


One side finished, on to the other side.


TMA Member #174

Offline 4-Liberty

  • TMA Forum Member
  • ***
  • Posts: 169
Re: Jacob Dickert Build Progress
« Reply #133 on: January 27, 2015, 06:35:00 AM »
The forestock work continues...

The ramrod channel molding was standing a little proud, so I decided to bring it down a bit.


Here is the termination of the ramrod channel molding near the muzzle.


Here I'm just doodleing some ideas for the termination of the forestock molding near the ramrod entry pipe.


I'm still undecided if im going to put in an incised molding and/or a flute molding on the lower forestock. I think it looks good as it is, but it would look better if I could get those in correctly,...CORRECTLY being the definitive term. I'd hate to attempt it and mess it up somehow. Captchee, do you happen to have a picture of that instrument you use to sand in the flute along the ramrod channel? I'm having a difficult time picturing in my mind on how to connect the two dowels.
TMA Member #174

Offline Captchee

  • TMA Forum Member
  • ***
  • Posts: 6215
Re: Jacob Dickert Build Progress
« Reply #134 on: January 27, 2015, 07:14:44 AM »
ill take a photo of it when i get home. Its really very simple , think of  making a raft  out of 2 logs . You lay the  logs side by side then nail two boards across the locks to hold them together  right ?
 Well in this case your using 2 dowels.. One dowel you screw down so that you can adjust   the distance apart .
 Again ill take photos when I get home