Your TMA Officers and Board of Directors
Support the TMA! ~ Traditional Muzzleloaders ~ The TMA is here for YOU!
*** JOIN in on the TMA 2024 POSTAL MATCH *** it's FREE for ALL !

For TMA related products, please check out the new TMA Store !

The Flintlock Paper

*** Folk Firearms Collective Videos ***


Author Topic: Wyosmith Building Tutorial  (Read 19200 times)

Offline Indiana

  • TMA Forum Member
  • ***
  • Posts: 560
(No subject)
« Reply #15 on: November 03, 2007, 06:11:50 PM »
Absolutely gorgeous, Steve!  Maybe with the next gun you build, you could do some more in depth photos on certain aspects that may be difficult for the beginner, such as the nose cap.  

I had a terrible time with mine and it dosen't look the best, but its on there!
"Damn the sword! When Virginia wanted a sword, I gave her one. Now she sends me a toy when I require bread!” -George Rogers Clark

Offline Indiana

  • TMA Forum Member
  • ***
  • Posts: 560
(No subject)
« Reply #16 on: November 04, 2007, 09:32:42 AM »
I used one of those premade ones from Track, but now I'm thinking I should have made my own.  I'll be sure to give you a call before I do my next one, though that may be a while.  I'm nearly finished with my current rifle though.  I'm doing the finishing sanding now and should be done by this weekend!  :)
"Damn the sword! When Virginia wanted a sword, I gave her one. Now she sends me a toy when I require bread!” -George Rogers Clark

Offline Wyoming Mike

  • TMA Forum Member
  • ***
  • Posts: 590
(No subject)
« Reply #17 on: November 10, 2007, 07:30:20 AM »
Here is the ramrod channel at the dogleg.  I am ready to inlet the entry pipe


Here we see that I have beveled some of the waste wood away, and have inlet and pinned the entry pipe.


Here the stock is shaped and sanded to 400 grit,  from the lock area to the muzzle.


Here are the tools I will use to cut a simple line molding.  If it were to be a relief molding I would still start the same way.  However for a proud molding you simply relieve all the wood from the molding up leaving a shoulder.  Then you cut the molding into any shape you like with gouges and files.  The budget on this rifle doesn't allow for such fancy work, but the principals are the same.

I trace a line at the spacing I want, using the flexible straight edge.  I come in next with the V tool and carefully cut it full length.  I use the edge of a file to make it straight, and then under cut it with a checkering tool.


Here you see the line cut full length and full depth. (sorry for the poor photography, but if you look carefully you can see what I am trying to show you all)


Here I inlet the front pipe, and mathematically figure out the spacing for the middle pipe.  You can see the pencil lines for it's placement coming........>>>>>>


...here.  All 3 pipes are now inlet, and the forstock is completely finished and ready to stain.


Here the buttstock is shaped and sanded.  The lower edge is fully sanded to it's final grit.  I then cut the lower butt moldings in.

Love the smell of black powder in the morning
Smells like fun.

Offline Wyoming Mike

  • TMA Forum Member
  • ***
  • Posts: 590
(No subject)
« Reply #18 on: November 16, 2007, 08:51:57 AM »
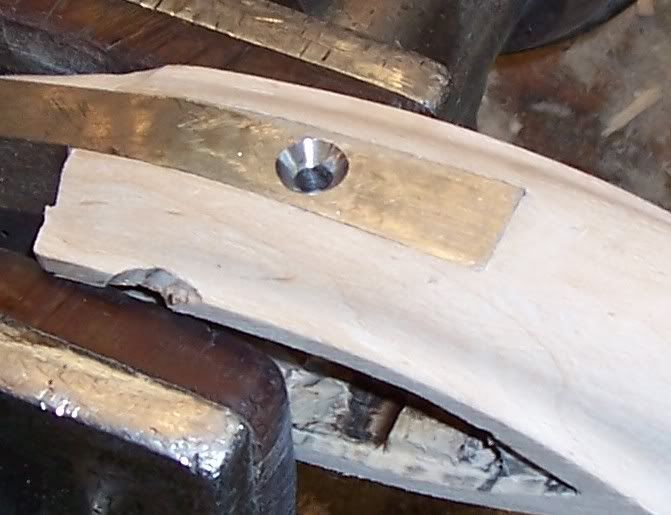
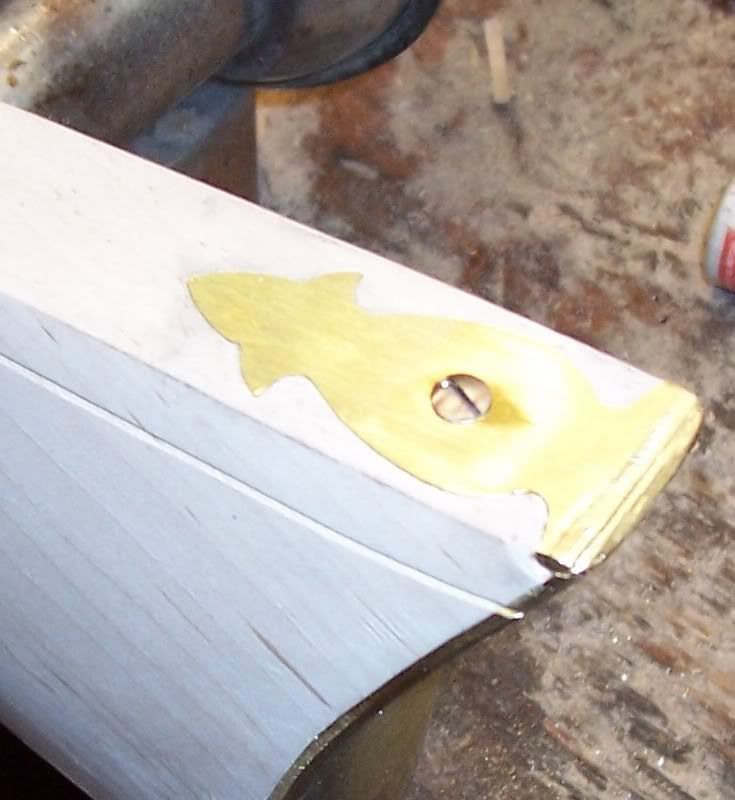
I have drilled a hole into the toe plate and a hole in the toe of the stock.  I put inletting black on the bottom of the toe plate and screw it down.  then tap on it all around with a hammer handle.


I am now cutting a line all the way around the inside of the inlay with a V tool.  


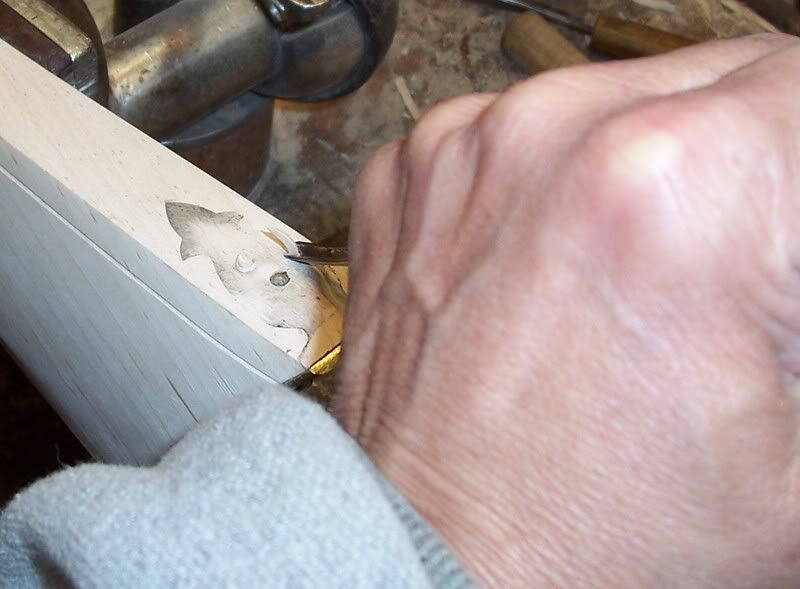
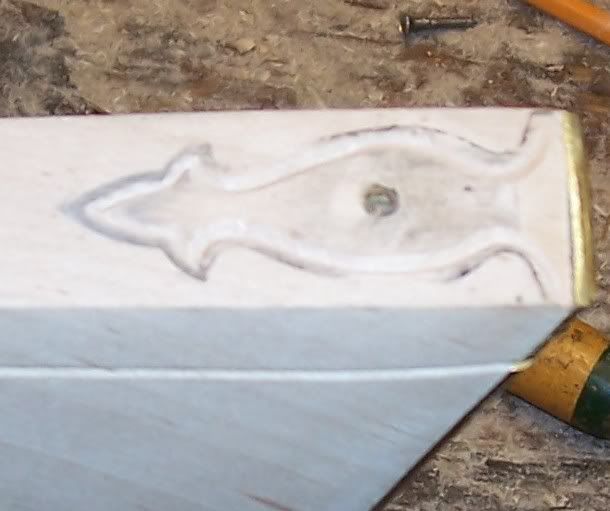
Here you see the V trench finished.  I then take small chisels and gouges and cut straight down around the black print made by the blackened inlay.  The wood gives way, but it collapses into the V trench, so the mortise for the inlay doesn't get too big.


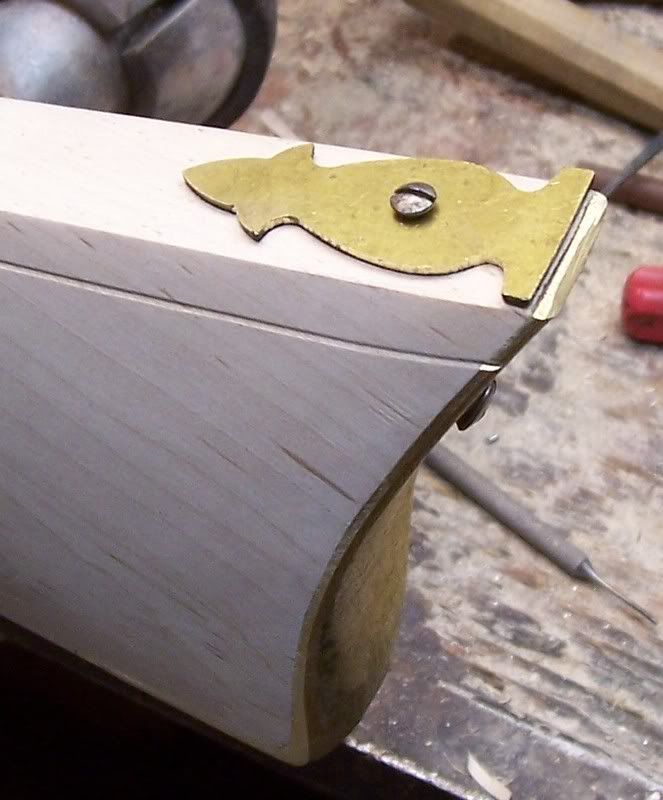
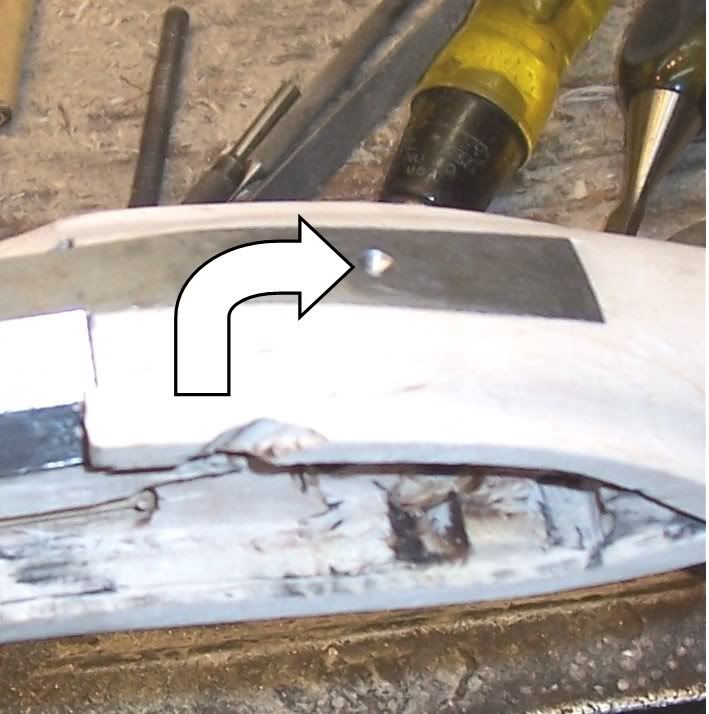
The toe plate is inlet 100%, and sanded smooth.  The whole toe line of the stock is then sanded to 400 grit.


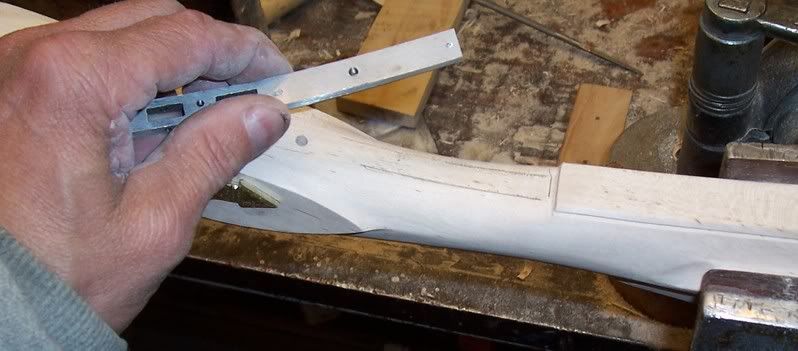
On this rifle I am using double set triggers (a deviation from the real Lehigh county style, but it's what the customer wanted).  I strip the triggers down and lay the trigger plate on the center line of the stock, and align the set screw hole with the lock's sear bar.  I trace a line around the trigger bar with a pencil.  I have a hole for a wood screw in the rear of the bar.  I use the V tool to trench around the inside of the line I just drew.  I then blacken the underside of the bar, and screw it down in it's proper position.  I tap around it and then remove the screw.  As you can see, it leaves me sharp lines where it will need to be inlet


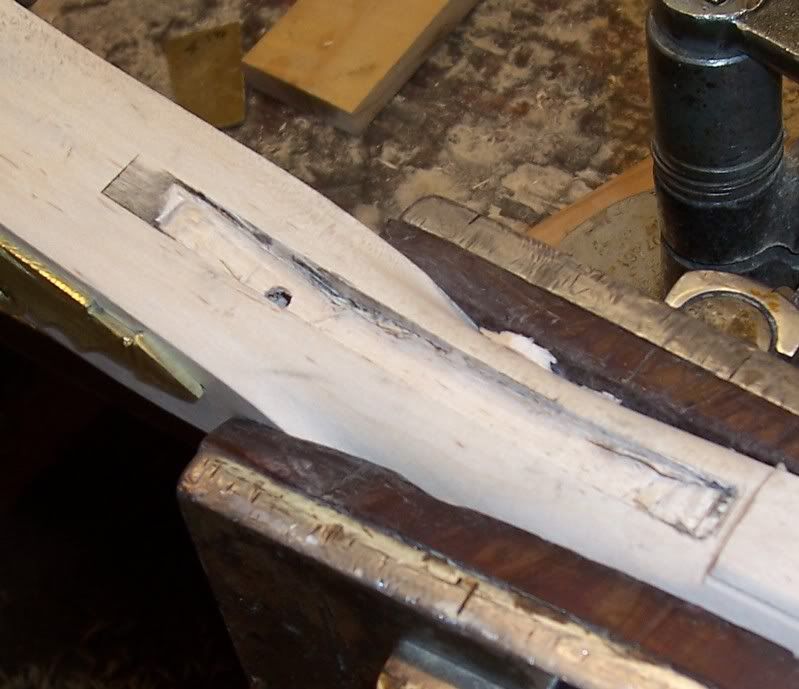
I have the bar inlet completely.  I drill a simple divot where I want my tang screw to come out.
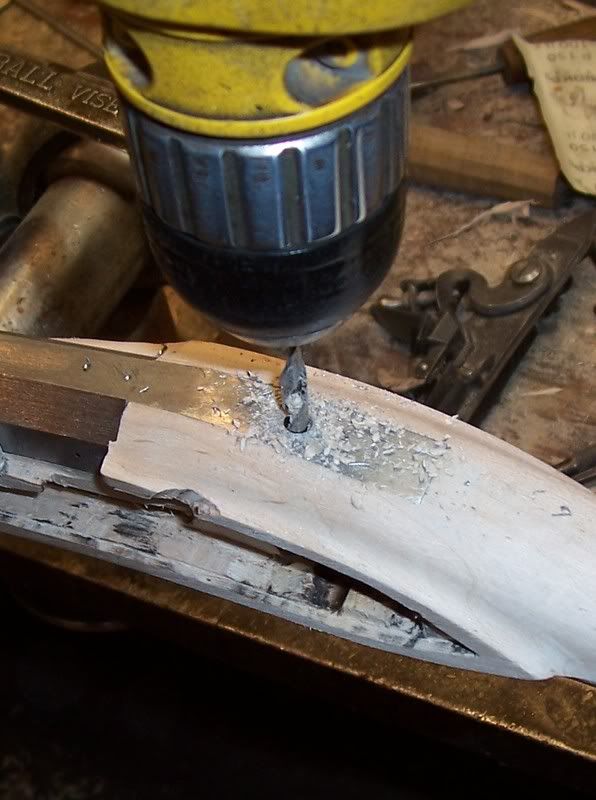
I am using a 10x32 bolt, so I use a number 22 drill here.  That's the root size for a 10x32.


I drill a similar divot where I want my tang bolt to go in.


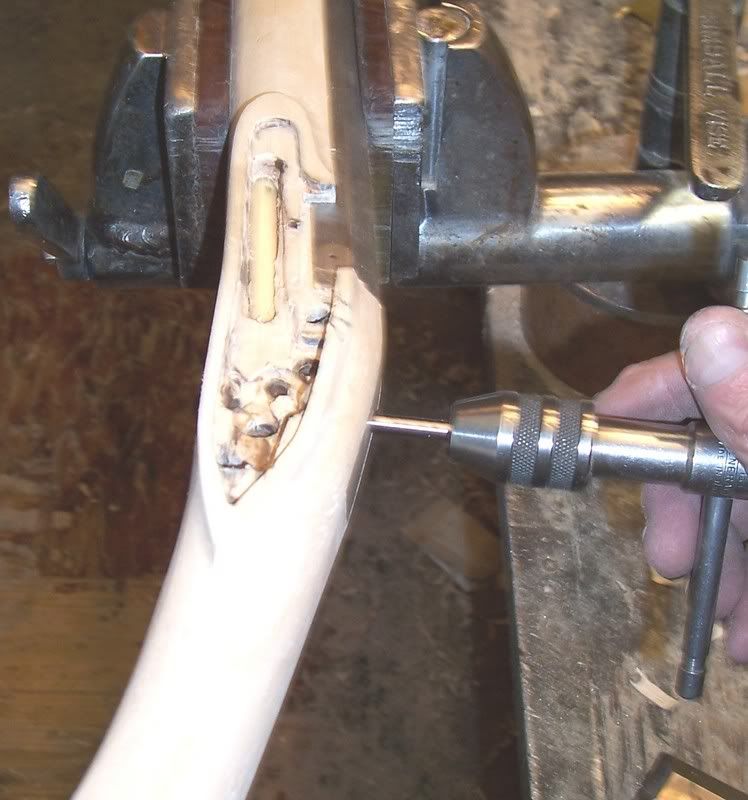
Here's a cool trick.  I have a screw adjustable vice, but all you really need is a piece of wood with a short nail pounded through it and a drill press.  You will move the nail around until it's point to point with the drill in your chuck.


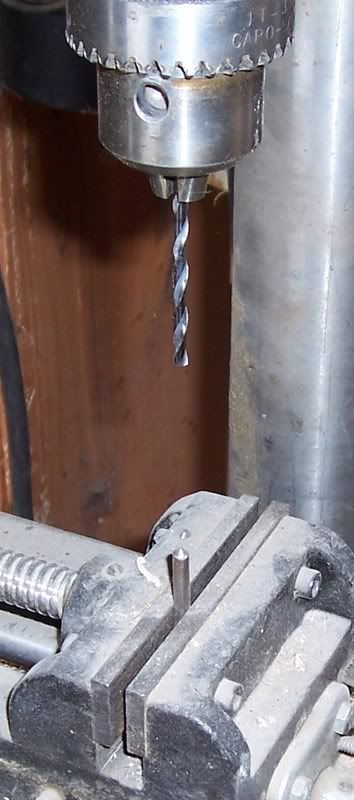
Here I have run the drill bit down so you can see what I mean.  It's point to point with the nail.


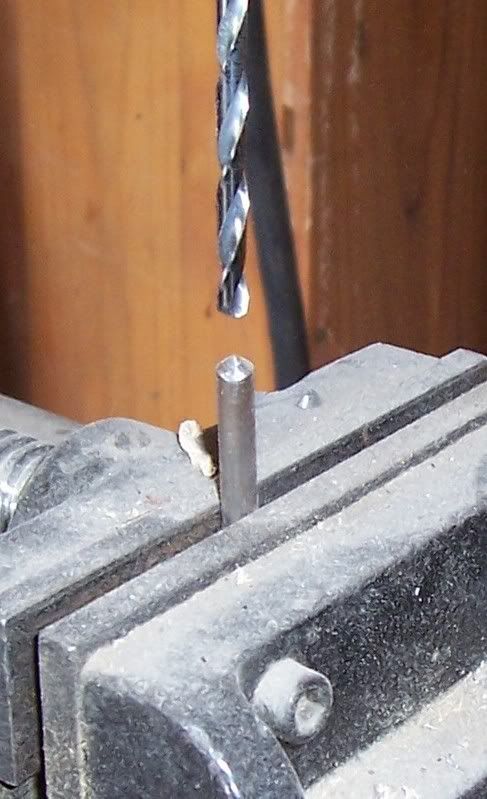
I set the nail into the divot I made in the trigger bar.  The drill bit is still aligned with it.  I move the rifle until the drill bit is in the divot I made in the tang.  now I drill halfway through.  You go halfway, and then reverse the rifle and come from the other side.  The minimizes any "run-out" of the bit.


(if you don't have a drill press, you will have to just try to get things aligned by eye, and by feel.  Have someone help you by viewing the angle of your drill from 90 degrees off from where you are viewing it, and try to get things aligned as well as you can)
 
 
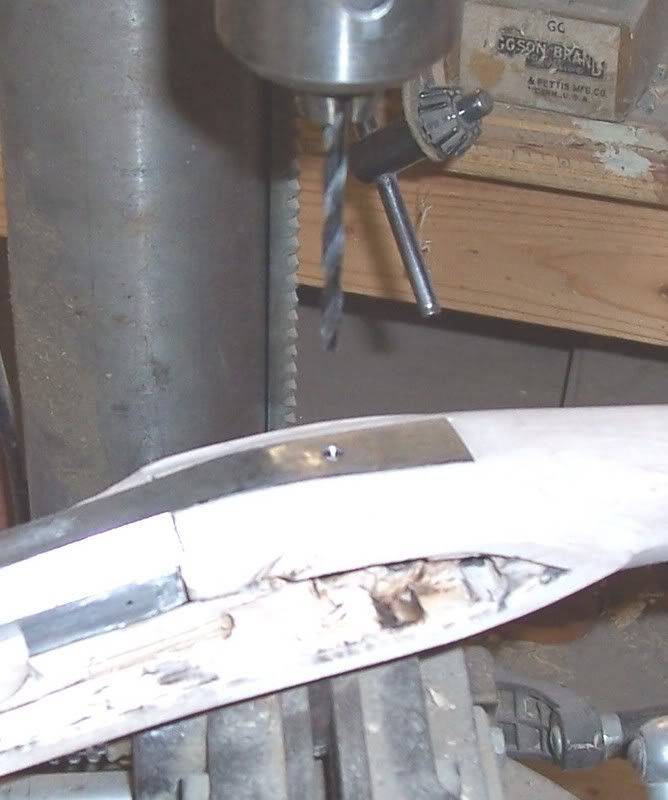
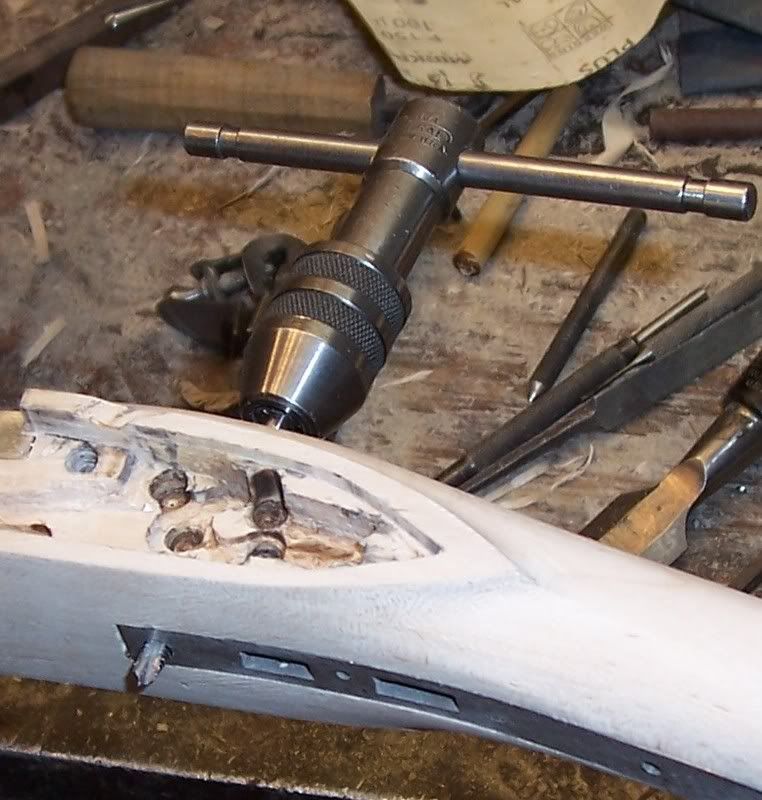
Here I have moved the rifle back to my bench, and I drill a clearance hole through the tang and the wood.   In this case, I use a number 9 drill.


Now I tap my hole.


Here you see the tap coming out.  The alignment is perfect if you do it this way.


I now counter sink the screw hole.  Screw in your tang bolt and cut it off to the correct length from the other side.

Love the smell of black powder in the morning
Smells like fun.

Offline Wyoming Mike

  • TMA Forum Member
  • ***
  • Posts: 590
(No subject)
« Reply #19 on: November 16, 2007, 08:53:27 AM »
Shows the triggers inlet, and the bolt and wood screw in place


Shows the rough sand cast trigger guard.  I file and polish it to it's final form before I inlet it.


Shows it ready to inlet.


I have inlet the trigger guard.  I lift it clear in this pic so you can see the mortises and tabs.
Drill your pin holes half way through, so you can see them come out in the tab mortises.  Then clamp the trigger guard in place and drill the rest of the way through.


Here you see it in place, and pinned.


Here the rifle is assembled.  I do this to get the point of balance.  If this rifle had a patch box it would have been inlet by now, right after I had inlet the toe plate.  If a rifle has a patch box it's going to effect the balance a little.  You remove wood, but you put some wood (for a wood box) or metal (for a metal box) back in it's place.  You can't guess as to how it will effect the balance exactly.  So reassemble and mark the point of balance.  You will install the rear sight so it's wither forward of the hand as the gun is carried, or behind it.  If your eyes are old, put it forward.  If you have young and/or very good vision, put the sight behind the hand as you carry the rifle at it's balance.
I have it on a table corner so you can see it here.


Here I have installed the rear sight.


The rifle is now ready for finish.  


If you have followed these steps you will find that your finish time is very much reduced.  I have sanded everything down as I built, so the stock is at 220 grit in most places and in some places it's all the way down to 400 grit.
 
So I will now do all the staining and oil finish on the stock.  When it's done and ready for the customer.  I then sight in the rifle.

I will then strip the rifle down and do the last polishing of brass and steel (which is very minimal because of the way I did most of it as I built the gun) and brown the parts.  When it's done even the marks of the drifts and files from sighting in will be finished and new looking.  I then reassemble the rifle and it's ready to hunt with.
:)
Steve Zihn
Love the smell of black powder in the morning
Smells like fun.

Offline Minnesota Mike

  • TMA Forum Member
  • ***
  • Posts: 641
(No subject)
« Reply #20 on: May 22, 2008, 05:40:08 PM »
Outstanding stuff - looks like the part about putting in the touch hole liner was not displayed however. Saw picture where there was no hole in the barrel . . . then later 'boop' - there it was.

By any chance did you document that step as well?

r/
MM
TMA number #269.
Expiration Date Oct 2010.

Offline Uncle Russ

  • TMA Contributing Member
  • ***
  • Posts: 7337
  • TMA Founder. Walk softly & carry a big Smoothbore!
  • TMA Member: Founder / Charter Member #004
  • Location: Columbia Basin, Washington State
(No subject)
« Reply #21 on: May 22, 2008, 08:15:24 PM »
Steve, Your attempt at modesty cracks me up at times.......You're far to fine a person to be "sneakin" anywhere!

Perhaps, sometime, when you have time, you might want to do a stand-alone thread on Flash holes.....including your own thoughts and experience with them.

A lot of old wives tales abound on the subject, and sometimes it's hard,  for the newbie, and the old hand for that matter, to separate the wheat from the chafe.

Respectfully, Uncle Russ...
It's the many things we don't do that totally sets us apart.
TMA Co-Founder / Charter Member# 4

Offline idahjo

  • TMA Forum Member
  • ***
  • Posts: 6
(No subject)
« Reply #22 on: May 29, 2008, 10:07:14 PM »
deleted as photos will not post
"I appreciate your hostilities is subdued"
Capt. Woodrow Call, Return To Lonesome Dove

Offline burch

  • TMA Forum Member
  • ***
  • Posts: 121
Re: Wyosmith Building Tutorial
« Reply #23 on: May 02, 2012, 11:29:31 AM »
Awesome tutorial, he makes it look easy. I wished I had that talent.
Member #471 Expires 5/16/09
If I Gotta Explain It You wouldn`t Understand It

Offline pathfinder

  • TMA Forum Member
  • ***
  • Posts: 741
Re: Wyosmith Building Tutorial
« Reply #24 on: May 02, 2012, 12:09:57 PM »
Too bad he's not here anymore,on the TMA. He did have talent.
NRA life member
NMLRA

Offline Voyageur

  • TMA Forum Member
  • ***
  • Posts: 602
Re: Wyosmith Building Tutorial
« Reply #25 on: May 02, 2012, 12:49:56 PM »
Pathfinder, I couldn't agree with you more. A tremendous talent which he was willing to share with us all. This ought to become a "sticky" in our gun builder's forum. I like others, don't share his skill depth but, continue to admire his hand work and our other fellow artists. I think that we members of the TMA family are the most fortunate traditional ML enthusiasts----there's is nothing close to a resemblance of our group than all others floating in the Cloud out there. A belated thanks to Steve---I think I could now build my own given the time. "Doc"
Artillerymen Do It With A Bang
Artillery the King of Battle
St. Barbara-Pray for us !

NRA Endowment Life

Charter Member #104-10/22/15
"JOIN THE TMA TODAY"

Offline petew

  • TMA Forum Member
  • ***
  • Posts: 15
    • http://www.peteward.com
Re: Wyosmith Building Tutorial
« Reply #26 on: August 16, 2014, 09:54:44 PM »
Threads like this are so good to follow. I am in the process of my first long rifle build, and these type threads show me so much valuable information and technique.
 Thanks
 Pete
Share your knowledge .

Offline sse

  • TMA Contributing Member
  • ***
  • Posts: 5370
  • TMA Founder
  • TMA: TMA Co-Founder, Charter Member, BoD.
  • TMA Member: Charter Member #3
Re: Wyosmith Building Tutorial
« Reply #27 on: August 16, 2014, 10:08:46 PM »
Quote from: "petew"
Threads like this are so good to follow. I am in the process of my first long rifle build, and these type threads show me so much valuable information and technique.
 Thanks
 Pete
That's good... :bl th up
Regards, sse

************
Consider joining the TMA...If you're not a member, you're missing out...

TMA Member #3
Exp. July A.D. 1821


Offline shootrj2003

  • TMA Forum Member
  • ***
  • Posts: 295
  • U.S.M.C 1972-1976 0331
Re: Wyosmith Building Tutorial
« Reply #28 on: February 26, 2021, 06:48:35 PM »
Who smith
  Nice work by the way,I am restocking a LymanGPR any special hints on working out the barrel Chanel considering the inleting for the seperate tang hook mount,I had actually considered routing the barrel channel with a flat channel bit or dado and a 45 deg. Vee bit but I have the tools to do it your way too,never Inletted a octagon barrel before ( can you tell?)lol. I had this curly maple for awhile working out how to do it right .it is bandsawed to the contour but I have been wondering about the barrel channel and all the attendant stuff for a couple years and want to get it done
  I also have a trade gun/ Fowler that is of an 1830 age that will require my making a half octagon half round barrel inlet into an as yet undetermined length stock ,I received it as what I thought was a half stock with a really wrecked and dry rotted stock now I think it was longer  and some other issues as well but the barrel and hardware is serviceable ,posted in caplock long arms if your interested but I have need to know how to inlet to succeed in these projects ,thanks.
I go forth armed and girded as a free man.

Expires 1/8/14
Member #609

Online Winter Hawk

  • TMA Contributing Member
  • ***
  • Posts: 2395
  • Location: Chauncey, OH
Re: Wyosmith Building Tutorial
« Reply #29 on: February 26, 2021, 07:14:23 PM »
He hasn't been on here in 10 years, unfortunately.
NMLRA Life
"All you need for happiness is a good gun, a good horse and a good wife." - D. Boone
USN June 1962-Nov. 65, USS Philip, DD-498

Dues paid to 02 Jan. 2025