Your TMA Officers and Board of Directors
Support the TMA! ~ Traditional Muzzleloaders ~ The TMA is here for YOU!
*** JOIN in on the TMA 2024 POSTAL MATCH *** it's FREE for ALL !

For TMA related products, please check out the new TMA Store !

The Flintlock Paper

*** Folk Firearms Collective Videos ***


Author Topic: My first rifle build, Flint Hawken  (Read 1062 times)

Offline SquirrelHeart

  • TMA Forum Member
  • ***
  • Posts: 40
My first rifle build, Flint Hawken
« on: May 03, 2010, 01:35:04 PM »
Below are some photos of my first attempt at building a rifle, my interpretation of a halfstock flilnter Hawken.  The barrel is a .54 Green Mountain, cut to 33".  All the metal furniture as well as the barrel are browned, the screw heads and barrel keys are fire blued, the triggers cold blued.  I made (almost) every mistake in the book, learned a lot by trying to fix them as I went along.  I welcome any constructive criticisms to help with my next build, a .40 caliber early Lancaster flint rifle.


Thanks for looking,
Curtis
Curtis aka SquirrelHeart
TMA Member #320
Exp. Date 04/25/11
NMLRA Member
NRA Life Member

Online BEAVERMAN

  • TMA Contributing Member
  • ***
  • Posts: 5919
  • TMA: TMA Vice President
  • TMA Member: Charter Member #145
  • Location: Vaughn, WA
(No subject)
« Reply #1 on: May 03, 2010, 02:11:18 PM »
Nice Job!
Jim Smith
TMA Vice President
Charter Member #145  EXPIRATION 1/21/25
Green River Mountain Men
Peninsula Longrifles
WSMA
U.S.M.C.
BSA                    


"An armed man is a citizen,..an unarmed man is a subject!"

Spotted Bull

  • Guest
(No subject)
« Reply #2 on: May 03, 2010, 02:32:58 PM »
Well the only real problem that I see is that you put the lock on the wrong side....


No, I'm kidding of course it looks great!!

Offline Gordon H.Kemp

  • TMA Forum Member
  • ***
  • Posts: 1767
(No subject)
« Reply #3 on: May 03, 2010, 03:18:51 PM »
Looks good ! but the 'Bull" is right , the lock is on the wrong side !
Gordy
TMA Charter Member #144
Expires 3/14/2013

Offline Bison Horn

  • TMA Contributing Member
  • ***
  • Posts: 700
  • Location: TX
(No subject)
« Reply #4 on: May 03, 2010, 04:19:55 PM »
Looks great. That's what I'm looking for in a rifle gun. Don't need all the brass fittings.
 I do get dizzy looking at that lock on the wrong side. :)
Alan Wright

Texas Trappers and Fur Hunters Association Life Member, LTAHA,National Trappers Association Life Member,FTA,NRA,NAHC Life Member
Dallas Muzzleloading Gun Club
"No freeman shall ever be debarred the use of arms"  Thomas Jefferson
Texas Trappers and Hunters Assoc.

Offline greyhunter

  • TMA Forum Member
  • ***
  • Posts: 1491
  • TMA Member: Membership #291, Expires 2/11/2019
Hawken
« Reply #5 on: May 03, 2010, 04:25:15 PM »
That truly shines, anyone would be proud to carry that rifle, even though the picture looks reversed.  ;)  C'est tres bien!
Pa. TMA State Representative.[/color]
Member#291  2/11/19

Offline Captchee

  • TMA Forum Member
  • ***
  • Posts: 6215
(No subject)
« Reply #6 on: May 03, 2010, 07:37:26 PM »
Ha now . For your first rifle that’s shines
for alittle constructive criticisms
 A couple things  for your next build .
 
 On your shaping .
. See its all about the lines  and proportioning . Take  the comb . Bring the nose of the comb down  so that from the  heal of the butt plate to the nose , you get a strait line .  The line should intersect at the top of the tang to ¼ back ..
 Also don’t trust the angles of casting . Most times you will need to do alittle tweaking . The comb line should  be strait and continues through  its entire length . That includes the butt plate area .
With some rifles  the comb will be curved  IE the roman nose combs . In the case of those  the curve should be clean  throughout . No peaks

 
 The length of the comb is then proportioned  to the length of the wrist    using a 3 to 5 scale . IE  from the b from the  breech end of the barrel  to the heal is 5 . Then the comb will be 3 .
 A simple way to do this without  getting deep into math , is to make a set of  dividers that are pinned to the 3 to 5 “Golden Mean “
 Not all rifles were built this way . But a large % were .

 The other thing I would point out  is  the use of sanding blocks is a must .
 
 Lets look at  the photo of your nose cap  . See how the stock dips  just before the wood . Before you start  the final shaping of the forearm . ,  leave the wood a little high and thick . Put  on your nose cap  and then block san the   top of the barrel channel down  to the top edge of the  nose cap . Then come back and  bring everything in tight and smooth . Doing that will get ride of that little dip  and give you again , clean  un broken lines .

  Sane with  the belly  under the lock mortises .  Bring that area on down  so that  it blends smoothly and thinly into the trigger area .
  Thus you will end up with less block lines .
 Which will be real important on your long rifle .

 Again nice job . Not bad at all . Well done

Offline Ironwood

  • TMA Forum Member
  • ***
  • Posts: 116
(No subject)
« Reply #7 on: May 03, 2010, 09:40:03 PM »
Beautiful job!  I can see why you are proud of that one.  Can't wait to see what the next one looks like.
Born in the Pineywoods of East Texas a long long time ago!

GO GREEN!   Recycle Congress!

Offline PJC

  • TMA Forum Member
  • ***
  • Posts: 107
(No subject)
« Reply #8 on: May 03, 2010, 09:55:59 PM »
That rifle will look a whole lot better.
Resting on top of a fat white tail.

But until then. It looks just fine.

Keep at it. I see some great workmanship and it will only get better with each passing rifle.

PJC
TMA #472
Exp June 2012

Offline Roaddog

  • TMA Forum Member
  • ***
  • Posts: 1580
  • TMA Member: TMA Paid Member # 247 Expires 3/15 / 2019
(No subject)
« Reply #9 on: May 04, 2010, 06:36:01 AM »
Very nice job. :rt th
Minnesota TMA State Representative

Member #247

Offline butterchurn

  • TMA Forum Member
  • ***
  • Posts: 839
(No subject)
« Reply #10 on: May 04, 2010, 11:18:03 AM »
You did very well for your first!  It is very good!
Butterchurn
Member # 249
Exp. 07/12/10

Set your course by the stars, not by the lights of every passing ship.
General Omar N. Bradley

Offline SquirrelHeart

  • TMA Forum Member
  • ***
  • Posts: 40
My first rifle build, Flint Hawken
« Reply #11 on: May 04, 2010, 11:41:23 AM »
Quote from: Captchee
...
 On your shaping .
. See its all about the lines  and proportioning . Take  the comb . Bring the nose of the comb down  so that from the  heal of the butt plate to the nose , you get a strait line .  The line should intersect at the top of the tang to ¼ back ..
 Also don’t trust the angles of casting . Most times you will need to do alittle tweaking . The comb line should  be strait and continues through  its entire length . That includes the butt plate area .
....
 The length of the comb is then proportioned  to the length of the wrist    using a 3 to 5 scale . IE  from the b from the  breech end of the barrel  to the heal is 5 . Then the comb will be 3 .
 A simple way to do this without  getting deep into math , is to make a set of  dividers that are pinned to the 3 to 5 “Golden Mean “.....
 The other thing I would point out  is  the use of sanding blocks is a must .
 
 Lets look at  the photo of your nose cap  . See how the stock dips  just before the wood . Before you start  the final shaping of the forearm . ,  leave the wood a little high and thick . Put  on your nose cap  and then block san the   top of the barrel channel down  to the top edge of the  nose cap . Then come back and  bring everything in tight and smooth . Doing that will get ride of that little dip  and give you again , clean  un broken lines .

  Sane with  the belly  under the lock mortises .  Bring that area on down  so that  it blends smoothly and thinly into the trigger area .
  Thus you will end up with less block lines .
 Which will be real important on your long rifle .

 Again nice job . Not bad at all . Well done

Captchee, I really appreciate the input.  I have a couple of questions for ya though to clarify things a bit.  Here is a pic that shows the top of the wrist:

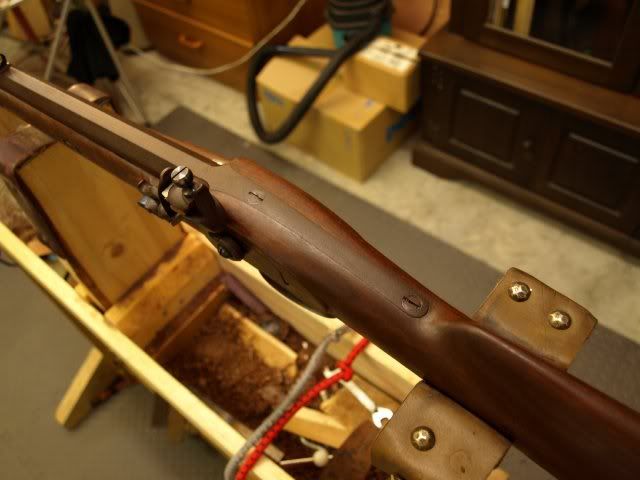
If I understand you correctly the angle along the top of the comb should intersect about a fourth of the way down the tang which would be about 1/2 to 3/4 inches behind the front screw?  Also the bit about not trusting the angles on castings is good to know... the misalignment of this one is probably all my doings however.
Here is a pic from when I was fitting it while the stock still has a beavertail cheekpiece, I never noticed at the time but you can see in the pic that the angle of the buttplate nose is too high.


I am familiar with the concept of the Golden Mean, but I confess I didn't apply any of the rules when I built this rifle.  I need to keep that in mind on the next one.

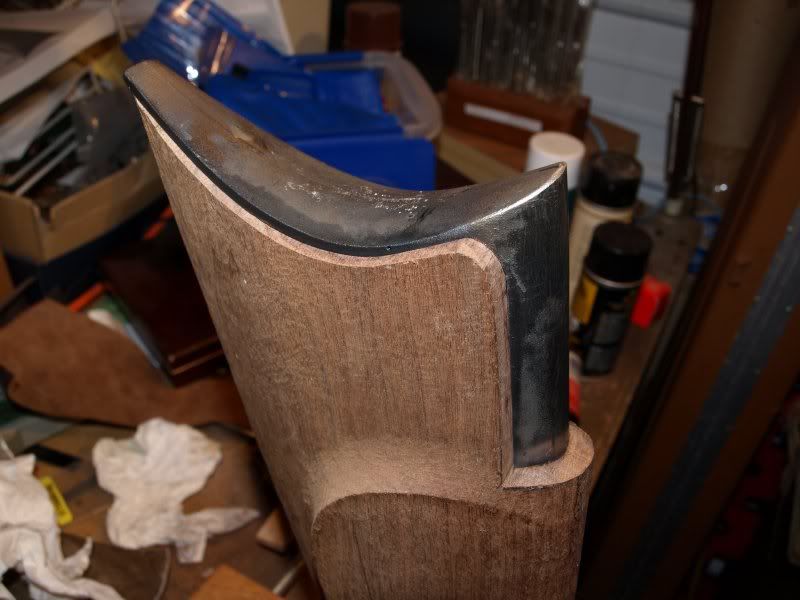
As for the nosecap - I was careful to use blocks when sanding, what i think happened here is my taper to the cap is way too short.  Ill attach a couple of closeup pics for you to look at an let me know what you think.... in one of them you can see a line where I had to glue a big chunk of wood when I removed way too much.  I had a lot of trouble fitting the nosecap, after a phone conversation with Wyosmith one day he gave me some pointers and I basically started over with it after doing some "damage control".

As for  the belly under the lock mortises, I thing I understand your meaning there.  I went much deeper with the trigger than I thought I would have to, I probably should have soldered some metal on top of the trigger bars  - I think that would have helped smooth out the transition.

Thanks again, I really enjoyed building this rifle and hope to continue on and improve with each one.  If you see anything else here please let me know.

Curtis
Curtis aka SquirrelHeart
TMA Member #320
Exp. Date 04/25/11
NMLRA Member
NRA Life Member

Offline SquirrelHeart

  • TMA Forum Member
  • ***
  • Posts: 40
(No subject)
« Reply #12 on: May 04, 2010, 12:53:26 PM »
Quote from: "Wyosmith"
That is very nicely done
My complements.
:)
Curtis aka SquirrelHeart
TMA Member #320
Exp. Date 04/25/11
NMLRA Member
NRA Life Member

Offline ridjrunr

  • TMA Forum Member
  • ***
  • Posts: 1261
  • Location: KS
(No subject)
« Reply #13 on: May 04, 2010, 01:03:01 PM »
Did you build this from a blank or a pre-carve?What stain and finish did you use?Do you have in process photos?
HCH member
NRA member
Fluent in English and sarcasm
TMA Member #313
Expires 10/8/21

Offline jbullard1

  • TMA Forum Member
  • ***
  • Posts: 955
(No subject)
« Reply #14 on: May 04, 2010, 03:08:36 PM »
The only thing I see wrong is It Aint Standing In the corner of my cabin :) Very Nice Job
Mississippi TMA State Representative
Member #318  Valid until Jan 15, 2011
Hatchie Run Longrifles Member