Your TMA Officers and Board of Directors
Support the TMA! ~ Traditional Muzzleloaders ~ The TMA is here for YOU!
*** JOIN in on the TMA 2024 POSTAL MATCH *** it's FREE for ALL !

For TMA related products, please check out the new TMA Store !

The Flintlock Paper

*** Folk Firearms Collective Videos ***


Author Topic: Changing out CVA lock to the L&R replacment  (Read 2059 times)

Offline prairie dog

  • TMA Contributing Member
  • ***
  • Posts: 798
  • TMA Member: Contributing Member #678
Changing out CVA lock to the L&R replacment
« on: December 13, 2016, 04:43:04 PM »
I finally replaced the lock on my Deer Creek version of the CVA Mountain Rifle.  All the locks on my CVA rifles have given me trouble at one time or another and I knew sooner or latter this one would too.  At the last rendezvous I attended it dropped the sear into the half cock notch on my last three shots.  The fly had worn down and didn't allow the sear to slide past the half cock.  This rifle has a very accurate shooting barrel and I like how it handles but it has to be reliable before I am comfortable hunting with it.

The lock plates on all my CVA rifles have a pointed tail but the Deer Creek lock is round.  I hesitated to order the L&R lock because the tail on it is pointed.  I wasn't sure it would work in the Deer Creek rifle.  I copied the photo of the L&R lock from the Track of the Wolf catalogue, cut it out, and compared that to the lock plate from the rifle.   It appeared it would work if I enlarged the inlet on the stock or filed the lock plate to match.  

The new L&R lock arrived and it came with a very good booklet of instructions on how to fit it into the lock mortise.  The back of the lock plate is marked with a line to follow if you want to file the plate round and remove the point.  I did that and it is a perfect fit with no modification necessary to the mortise in the stock.  That information is not given in the Track catalogue or on L&R 's web site.  Had it been, I would have done this a year ago.

It wasn't difficult to fit the lock into the existing mortise.  After dissembling the lock, I filed the lock plate to fit the mortise.  The line indicated how much to remove to shape the tail.  The plate is also slightly larger than the in-letting which gave me room to file a slight inward angle toward the back of the plate.  That helps when removing and replacing the lock for cleaning and prevents chipping the edges of the mortise should the wood ever swell tight in that area.  

The bolster on the lock plate needed to be filed down too so the lock plate would sit flush in the mortise while snugging up tight against the barrel.  They left the bolster plenty wide enough for that.  When I had the lock plate fitted correctly I reassembled the lock and marked the high spots on the internal parts with a cheap lipstick to show where it was contacting the wood inside the mortise.  A very little bit of wood needed to be removed here.  Again, the instruction booklet had good directions.  I did need to file the sear arm a little to match it up with the trigger.  There is plenty of metal there and the instructions indicate where to remove it.  Yes there is some filing to do but that is intentional to give you a really good fit on everything.  It is much easier to file away excess metal than to add metal.  

At this point the lock fit properly into the mortise with no moving parts contacting wood.  The hammer needed to be bent slightly to make it hit the nipple squarely.  I removed it, heated it with a torch, and tweaked is slightly.


The sear arm is also extra long and thick.  You will have to do some filing there as well and the instruction booklet indicates where and how to do that.  This is a good thing and allows you to have a good fit between the sear and your trigger.  You won't need to refit the in-letting on your triggers.  I checked the function to be sure the lock operated correctly with the half cock and full cock notches and the set triggers functioned both ways.  I needed to adjust the setting on the set trigger and file the sear arm a little more so the lock would cock into the half and full cock positions with the trigger set or unset. Then checked and double checked to be sure it all operated safely and correctly.

 The geometry on the tumbler is good and the sear arm aligned to the same point in all three positions.  It sits just about perfectly on the two trigger levers.  Then I dissembled the lock, polished everything nice and smooth, and blued the outside of the lock plate and the hammer.  It didn't take a lot of tools or talent to do any of this.  The L&R lock is not a "drop in replacement part" but it isn't difficult or too daunting a job.  Had I seen the instruction booklet or had the information I just wrote, I would have done this sooner.

I decided to make a few more upgrades and refinish the stock while I was working on this rifle.  Who ever had the rifle before me had done a poor job of epoxy bedding the tang and the bedding was rather soft.  I removed all that and did it right with acraglass.  Then I striped the finish off the stock, removed that ugly router line CVA leaves around the cheek piece, and reshaped the nose of the comb.  I used Laurel Mountain Forge stains and painted on faux stripes (inspired by Leman plains rifles).  modified the trigger guard, installed slotted and pined wedge keys, and touched up the finish on all the metal.

This is the rifle when I got it a few years ago.
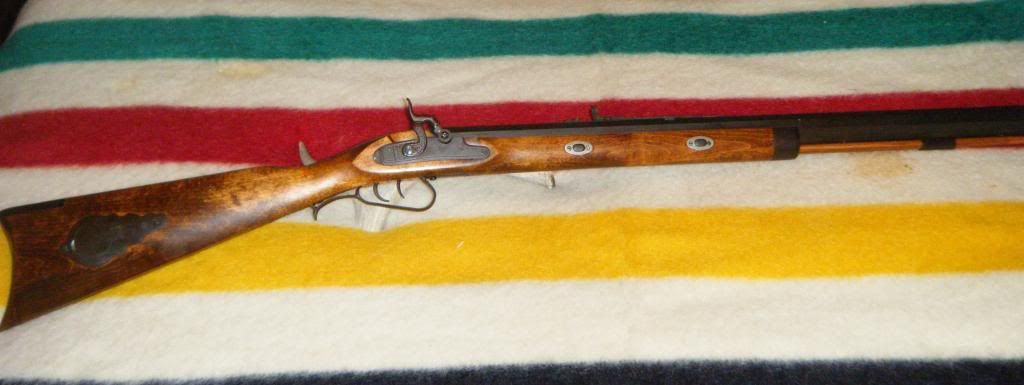

And the same rifle now. (mouse click the photo to enlarge it I had to up load the photos from two different sources.)
Steve Sells

Online Bigsmoke

  • TMA Contributing Member
  • ***
  • Posts: 4277
  • TMA: Charter Member #150
Re: Changing out CVA lock to the L&R replacment
« Reply #1 on: December 13, 2016, 05:03:11 PM »
Great tale of the installation process.  Bet you are one happy guy about now.
Good job.
Thanks for taking us along on the trip.
John
Live simply. Love generously. Care deeply. Speak kindly. Leave the rest Up to God.

BigSmoke - John Shorb
TMA Charter Member #150  
NRA - Life
Coeur d'Alene Muzzleloaders - Life

Online rollingb

  • TMA BoD
  • ****
  • Posts: 7012
  • TMA Founder
  • TMA: Founder
  • TMA Member: TMA Charter Member#6
  • Location: Northwest KS
Re: Changing out CVA lock to the L&R replacment
« Reply #2 on: December 13, 2016, 05:55:58 PM »
Thanks for the info and your description of the L&R lock and it's installation.  :hairy
"An honest man is worth his weight in gold"
For only $1.25 per-month, you too can help preserve our traditional muzzleloading heritage.
TMA Founder
TMA Charter Member #6

Offline Roaddog

  • TMA Forum Member
  • ***
  • Posts: 1580
  • TMA Member: TMA Paid Member # 247 Expires 3/15 / 2019
Re: Changing out CVA lock to the L&R replacment
« Reply #3 on: December 14, 2016, 08:04:50 AM »
Ya sure did a nice job on that CVA PD.Thanks for the how to do on the lock and the good photoes.
Minnesota TMA State Representative

Member #247

Offline Hanshi

  • TMA Forum Member
  • ***
  • Posts: 948
    • http://www.martialartsusa.com
Re: Changing out CVA lock to the L&R replacment
« Reply #4 on: December 14, 2016, 06:35:51 PM »
That rifle looks great, now.  You did a splendid job, IMHO.
Young guys should hang out with old guys; old guys know stuff.

Offline freddy

  • TMA Forum Member
  • ***
  • Posts: 11
Re: Changing out CVA lock to the L&R replacment
« Reply #5 on: December 14, 2016, 09:40:56 PM »
Nice job on installing the L&R lock. You will notice the throw of the L&R hammer is much less, about half, of the CVA lock. This will give you much less lock time, adding to accuracy.

Offline prairie dog

  • TMA Contributing Member
  • ***
  • Posts: 798
  • TMA Member: Contributing Member #678
Re: Changing out CVA lock to the L&R replacment
« Reply #6 on: December 16, 2016, 09:55:17 AM »
Went to the range with this rifle yesterday.  Discovered I'd loosened the rear sight during the rework and didn't take any tools.  However, the lock and triggers are MUCH improved!  Will take it back out for serious group shooting and sighting in after the Holidays.  Hoping to make this my go to hunting rifle.  The GPR is a bit heavy to tote up and down mountains, It prefers very tight loads, and 50 cal balls are a little light for what I have in mind.  

Also hoping my new 40 cal Lancaster will be ready for rendezvous season.
Steve Sells

Offline prairie dog

  • TMA Contributing Member
  • ***
  • Posts: 798
  • TMA Member: Contributing Member #678
Re: Changing out CVA lock to the L&R replacment
« Reply #7 on: January 01, 2018, 04:27:21 PM »
Updates on this rifle.  She looks much better after the refinish and addition of painted on stripes.
 [ Invalid Attachment ]

The L&R lock is a big improvement over the original CVA.

She still shoots good. Since my last post on this rifle Iv'e changed out the front sight, done a complete load work up, and had my cataract surgery. 

 [ Invalid Attachment ]

« Last Edit: January 01, 2018, 04:34:03 PM by prairie dog »
Steve Sells

Offline prairie dog

  • TMA Contributing Member
  • ***
  • Posts: 798
  • TMA Member: Contributing Member #678
Re: Changing out CVA lock to the L&R replacment
« Reply #8 on: January 01, 2018, 04:35:53 PM »
couple more targets.
 [ Invalid Attachment ]

 [ Invalid Attachment ]

Steve Sells

Offline prairie dog

  • TMA Contributing Member
  • ***
  • Posts: 798
  • TMA Member: Contributing Member #678
Re: Changing out CVA lock to the L&R replacment
« Reply #9 on: January 01, 2018, 04:37:27 PM »
I think she's ready to hunt.

 [ Invalid Attachment ]
Steve Sells

Offline Uncle Russ

  • TMA Contributing Member
  • ***
  • Posts: 7342
  • TMA Founder. Walk softly & carry a big Smoothbore!
  • TMA Member: Founder / Charter Member #004
  • Location: Columbia Basin, Washington State
Re: Changing out CVA lock to the L&R replacment
« Reply #10 on: January 01, 2018, 04:38:49 PM »
My Goodness!  :Doh!


Not sure if it was the re-work or the Cataract Surgery, but that is one fine shootin riflegun!
That dog will hunt!

Good On You Prairie Dog, and Happy New Year!

Uncle Russ...

It's the many things we don't do that totally sets us apart.
TMA Co-Founder / Charter Member# 4

Offline prairie dog

  • TMA Contributing Member
  • ***
  • Posts: 798
  • TMA Member: Contributing Member #678
Re: Changing out CVA lock to the L&R replacment
« Reply #11 on: January 01, 2018, 04:49:56 PM »
Thanks Russ,

I think it 's a combination of a good barrel, serious load work, and better eyesight.
Steve Sells

Online Hank in WV

  • TMA Contributing Member
  • ***
  • Posts: 2049
  • TMA Member: Charter Member #65
Re: Changing out CVA lock to the L&R replacment
« Reply #12 on: January 01, 2018, 05:13:58 PM »
Wonder if that surgery would help even if you don't have cataracts? Good shooting pd.
Hank in WV
TMA Charter Member #65, exp 4/30/2026
"Much of the social history of the western world over the past three decades has involved replacing what worked with what sounded good. . ." Thomas Sowell

Offline prairie dog

  • TMA Contributing Member
  • ***
  • Posts: 798
  • TMA Member: Contributing Member #678
Re: Changing out CVA lock to the L&R replacment
« Reply #13 on: January 01, 2018, 06:12:56 PM »
Well, there is laser surgery to correct vision.  Cataract surgery replaces your lens.  I have 20/15 vision now.     
Steve Sells

Offline Uncle Russ

  • TMA Contributing Member
  • ***
  • Posts: 7342
  • TMA Founder. Walk softly & carry a big Smoothbore!
  • TMA Member: Founder / Charter Member #004
  • Location: Columbia Basin, Washington State
Re: Changing out CVA lock to the L&R replacment
« Reply #14 on: January 01, 2018, 07:38:25 PM »
Well, there is laser surgery to correct vision.  Cataract surgery replaces your lens.  I have 20/15 vision now.   

Hank. ol' bud, I don't think there's ever been a surgical procedure that would help either of us shootin.
But, there's hope, and this is a brand new year, so maybe something will come along that will promote a few more "X's" for us....iff'n ya should hear about it, be dang sure ya let me know ASAP!

Happy New Year, Ol' Bud!

Russ...
It's the many things we don't do that totally sets us apart.
TMA Co-Founder / Charter Member# 4