Your TMA Officers and Board of Directors
Support the TMA! ~ Traditional Muzzleloaders ~ The TMA is here for YOU!
*** JOIN in on the TMA 2024 POSTAL MATCH *** it's FREE for ALL !

For TMA related products, please check out the new TMA Store !

The Flintlock Paper

*** Folk Firearms Collective Videos ***


Author Topic: Jacob Dickert Build Progress  (Read 27941 times)

Offline 4-Liberty

  • TMA Forum Member
  • ***
  • Posts: 169
Re: Jacob Dickert Build Progress
« Reply #30 on: January 27, 2014, 06:41:43 AM »
What are your thoughts on this passage conserning the rear lock bolt location? It's from "Recreating the American Longrifle."
It's pretty much saying that the rear lock bolt entry (side plate side) should be lower in position than its exit on the lock plate side.
TMA Member #174

Offline Captchee

  • TMA Forum Member
  • ***
  • Posts: 6215
Re: Jacob Dickert Build Progress
« Reply #31 on: January 27, 2014, 11:43:04 AM »
I agree . but it also depends .
  While I like shumway’s book , which is what I learned the basics on many , many years ago  , is IMO good , its often time lacking in  details  that  are rather needed .
 In this case WHY  is the lock bolt canted . All he says is  that its for architecture. But what is it that he is really talking about  lets take a look at this original Derrick  “thanks to the ALR virtual Museum “


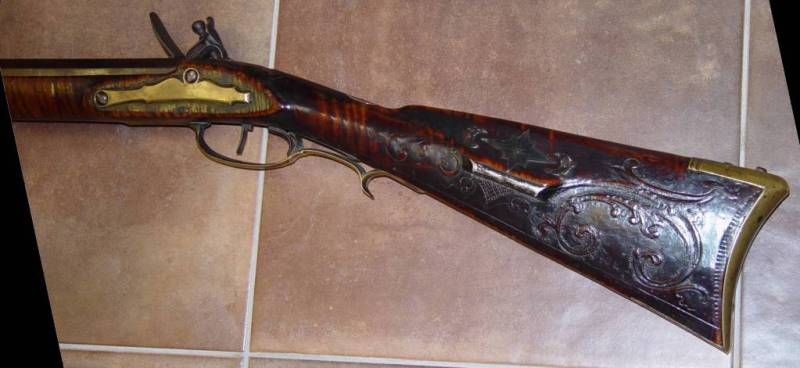
 Take note of the  mortise. Notice how the top of the left hand mortise begins as as a line off of the top of the side flat . As such , both your bolt and side plate must set below that line . This is the architecture he is speaking of .
 For the most part this   common thought all the different makers . Sometimes you might see that line a little high but its not often .
Also if we look at the lock plate mortise , its also  aligns with the  top of the opposing side barrel flat


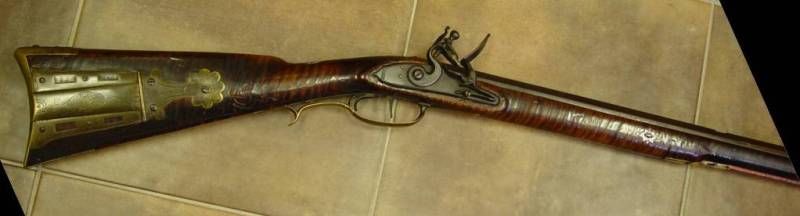
Again this is the architecture Shumway was speaking of in his suggestion on canting the angle of the bolt

 Now  as to the Depends part .
Shum way  in his writings , as do most other writers , assumes you are building from a plank  not a
 Pre-carve .  I know of no books being published about building from pre-carves . that’s Odd because frankly they have issues that are not covered in the books and thus folks struggle through or make very big mistakes . Basically the more you have done for you , the greater your issues can be  concerning a  pre-carve because  in turn you reduce your options  .  
 
So in this case  you are stuck with your lock inlet . It is where it is and you now have to deal with that .
vs. from a plank you can make planned adjustments like slightly canting the tail of the lock down  to help position the  rear bolt and  help the front bolt clear the RR channel ..
 So what to do ?
 Well , if you have not noticed yet , most everything  in  building a rifle is about planning . it’s a game of chess . Not only are you looking at  your next move but you also have to look at the effects of that move on everything else . IE  everything is linked .
So set back an plan out your  lock bolts  placement. In doing so realize that  the placement of the bolt is then going to effect your side plate and your Ram rod channel .
So the more info we have , the better of we will be .

So  here is what I would do if it were me .

Remember back  when shumway was talking about drilling the RR  hole , he discussed drilling small holes in the bottom of the barrel channel so as to  judge the position of the RR .
 Drill two in the bottom of the barrel channel . One so that its  even with where  the front lock bolt  will be and one just back of your entry thimble  .
 Now place the RR in the stock  so that its all the way back . Insert a small piece of wire  or what have you in the holes tell it touches the RR . that’s the top of your  hole .  Mark that position  on  both sides of your stock .
It should be just below your reference line for the bottom of the barrel channel .
 Now remove the RR and again  insert your  wire  tell it touches the bottom of your hole . Mark that location on  both sides of your stock . Now take a strait edge and draw a line between  the upper  marks and one between the lower marks . Now you know where the RR channel is .  you should have 3 lines  on both sides of your stock
 top line is the barrel channel . just below that the top of your RR Hole . Just below that , the bottom of the RR hole .

 Now  with your barrel  placed in the stock and  clamped so that its fully down in the barrel inlet   we then look at the  lock plate side of the stock .
 Looking at the lock itself , there will be a  thick section , back of the pan  for you    thread your rear  lock bolt into. Make a mark  in your inlet that corresponds with the position  on the lock . Draw you a line all the way around your stock  so that it corresponds with that mark  in your  lock inlet .

 Now with your micrometer , measure from that point down  to the existing belly “IE where the triggers will eventually set  . Take that measurement and transfer it to  the left side mortise. IE you now have a vertical line "the line you drew around your stock " and a horizontal line "the measurment to the bottm of the stock "
 Double check your measurements.
Do the same thing with the front  lock bolt position .
 You now know where the lock bolts will come out  if your drill strait .
 Set back an look at what you have and ask yourself these questions .

A) will the placement place the  rear lock bolt low enough to achieve the required architecture of the   mortise. If not  can the hole be angle slightly ?
 Keep in mind that to much angle will then show up as the whole  mortise must be at the resulting angle so that the bolt will  be flat to the side plate OR the side plat must be brought to that angle . Myself i dont like angling the mortise itself. its just to easy to  have to much .  
OR can you lower the lock bolt position any at all  where it  threads into the lock .
DON’T GO TO LOW. You have to keep enough room for the threads to hold properly

B) does the position  require the rear of the  breach /tang support to be drilled through  or notched . If so , make a not of it that .

C) will the front lock bolt go through the RR channel ?
 If so where . Is it high low or center ?
   It should clear  or be high enough that you can file a notch around the bolt so as to clear the RR .
 If its center then you might want to seriously consider only using  the rear lock bolt . If you want the look of two bolts you can always turn the front bolt into a wood screw .
 But it cannot run center through the RR  hole .

 So now you see the DEPENDS part of my comment . If angling the bolt slightly “within reason “achieves the desired results , then yes  I would agree . But if it turns out that its not needed  OR the required angle to be to great ,then  I would not .
As you can see , by having someone else inlet your lock , it has now  confined you to a given position . You no longer have the leeway of setting the lock  a little low OR slightly canted so as to  help  with the bolt positions . . Simple fact maybe that no mater what you do , you may be  stuck with the architecture of the   mortise’s being a little high . Now some would disagree with me on this but. IMO its  less of an issue to have the architeure alittle  high then it is to have a majorly canted  mortise .

Offline 4-Liberty

  • TMA Forum Member
  • ***
  • Posts: 169
Re: Jacob Dickert Build Progress
« Reply #32 on: January 27, 2014, 02:28:29 PM »
Wow, that's a lot of good information! I'm going to have to read that a few times over to grasp it completely. I figured the lock bolt positioning was going to be a bit of a challenge.
In the mean time, I just finished inletting the barrel tang. I feel like i got a good wood-to-metal fit, but there's a couple things; first, I did my best to bend the tang to the curvature of the stock but its definitely not perfect. It's standing a little proud in a couple areas, about 1/3 I'd the way back and at the very rear. Should I try to rebend it to fit better, or just file it to to fit the curve? If I rebend it I run the risk of it not matching with the mortise I inletted, and if I file it I run the risk of the tang being too thin.


Second, the barrel is all of the way down in the channel but the bottom of the tang isn't making contact with with the bottom of the mortise. Either I bent the tang improperly or the precarved mortise is too deep. When I screw in the tang screw I'd like to have a firm bed for the tang to be screwed down on.
TMA Member #174

Offline Captchee

  • TMA Forum Member
  • ***
  • Posts: 6215
Re: Jacob Dickert Build Progress
« Reply #33 on: January 27, 2014, 03:55:03 PM »
At this point I wouldn’t file the tang any . Go ahead an leave it proud .  Also I wouldn’t worry to much about the tang being off the bottom of the  bottom of the inlet unless its like ¼ inch off .
 The reason for that is when you  install the triggers and resulting tang  bolt , the tang is going to suck down deeper into the inlet .
 In doing so the end of the tang that’s high now , will need to go down ..
 But you need to get your barrel pined in place prior . That way you don’t end up with having the muzzle raise from the inlet when you tighten down the  tang bolt

See how much higher the surrounding wood is at the breech , that’s about how much lower the rest of the tang will end up dropping down below the top of  wood , when all is said and done .
 I have found that with pre-carved stocks , you normally have at lest 3/16 to  ¼ inch of wood to take off  everywhere

Offline 4-Liberty

  • TMA Forum Member
  • ***
  • Posts: 169
Re: Jacob Dickert Build Progress
« Reply #34 on: January 28, 2014, 01:46:06 AM »
Will the tang eventually bend in time to conform to the shape of the stock from being screwed down over a long period of time?

Also, the book states that before the final finishing of the barrel the builder should file 0.02" off of the very back of the tang to allow for rearward movement of the barrel, otherwise it may eventually chip the rear of the tang mortise. Is this common practice among builders?

Thank you, very much for your advice. It is greatly appreciated! If you keep this up, I might have to name the rifle after you. :lol:
TMA Member #174

Offline Captchee

  • TMA Forum Member
  • ***
  • Posts: 6215
Re: Jacob Dickert Build Progress
« Reply #35 on: January 28, 2014, 07:47:34 AM »
No the tang will not eventually conform  unless you make it conform .
   But if you file the tang to the profile now , then once its pulled down in the inlet by the tang bolt ,   you will loose the profile and will have to re shape it .
 Again , keep in mind that your stock needs a lot of wood removed  before it is down to your finishing dimensions.  Take note of how high the stock is above the breech area . Now think of the stock having a skin that is that thick  or more . All that skin has to be removed .
One of the things a pre-carve does is  give a builder an  finished profile . It does not give you finish dimensions.

As to filing the tang short . Normally I don’t  . what I do is bevel the underside edge  . In doing so  any backward movement will force the tang proud vs. chipping out the stock   . The other thing the bevel does is that while it helps in providing a tight inlet , its also  deduces the chance of undercutting the inlet . IE ,  often times if you try and do a 90 deg deep inlet .  You don’t end up at 90 deg  down in the inlet .  If it ends up undercut , then when you file the part down or file the wood down to the part , what  first appeared to be a nice tight inletting job , is suddenly a grand canyon type of  opening surrounding the part .

 Tangs normally have a lot of meat on them, ¼ inch or more .  so as long as yours does, you will be able to file it down to profile once you get things  together .

As to whats common with other gun makers .
  Each of us do things a little differently .  IMO none of us regardless of the level of experience , stop learning  new ways on new techniques. Most likely if we do  were about to be 6 feet under .
So my advice to you is as you grow in this experience , keep in mind that  knowledge can come from a lot of different places . Never ever get so  full of yourself that you  fail to see  the knowledge you can gain  from even someone who you may think to be less knowledgeable then yourself .
 As such all I can tell you is how I do my work .  Sometimes that’s common  with other  gunsmiths . Sometimes its not . Its how I do it . As such it doesn’t or wont hurt my feelings in any way if you chose to do a given task in a different way . All that maters is you achieve the same end result  

OHH PS .
 The gun will tell you its name by the time you are done . Every gun I have ever built had a name before I left my hands . I just don’t tell the customers what that name is .
 If you don’t rush into these tasks , the wood and metal will begin to speak to you . Listen to it . When you do, things will go smoothly . When you don’t , you will struggle. So if you find yourself struggling , its time to step back , gather your thoughts  until such time as you once again  picture a end result .
 Go slow

Offline 4-Liberty

  • TMA Forum Member
  • ***
  • Posts: 169
Re: Jacob Dickert Build Progress
« Reply #36 on: January 29, 2014, 11:11:32 AM »
Just finished cutting in the first dovetail for the barrel lug. Went off without a hitch. One down, two to go!


TMA Member #174

Offline TallTexan

  • TMA Forum Member
  • ***
  • Posts: 140
  • You can't kill a man who is born to hang.
Re: Jacob Dickert Build Progress
« Reply #37 on: January 29, 2014, 07:08:14 PM »
Please educate me as to what is the clear blue substance around the spot where the dovetail is filed and what is it's purpose?
Member 629

Offline Uncle Russ

  • TMA Contributing Member
  • ***
  • Posts: 7337
  • TMA Founder. Walk softly & carry a big Smoothbore!
  • TMA Member: Founder / Charter Member #004
  • Location: Columbia Basin, Washington State
Re: Jacob Dickert Build Progress
« Reply #38 on: January 29, 2014, 07:43:43 PM »
Quote from: "TallTexan"
Please educate me as to what is the clear blue substance around the spot where the dovetail is filed and what is it's purpose?

What you are seeing is a form of "Dykem Blue"....It is used by machinist and gunsmiths to insure a near exacting fit / finish.
Used as a marker it is temporary, easily removed, and provides tell / tell signs of contact with other materials.
It is a must for any gun tinkerer.

ITW Professional Brands l Dykem® l Hi-Spot l DYKEM® Hi-Spot Blue

Uncle Russ...
It's the many things we don't do that totally sets us apart.
TMA Co-Founder / Charter Member# 4

Offline TallTexan

  • TMA Forum Member
  • ***
  • Posts: 140
  • You can't kill a man who is born to hang.
Re: Jacob Dickert Build Progress
« Reply #39 on: January 29, 2014, 08:25:02 PM »
I appreciate the info, maybe someday I will muster up the nerve to try and build my own muzzle loader.  Meantime I enjoy learning about it.
Member 629

Offline Captchee

  • TMA Forum Member
  • ***
  • Posts: 6215
Re: Jacob Dickert Build Progress
« Reply #40 on: January 29, 2014, 08:47:51 PM »
Yep what Uncle Russ said . myself i use a blue sharpie . not as strong as Dykem Blue but achieves the same result .

Nice job on the dove tail Liberty .
 Next time , before you try and cut all those little  notches out with the hack saw, run a layer of masking tape  on each side . That way if your saw slips it stands less of a chance of  marring up  the surface of the barrel.
 It really does suck when the saw slips out  and screws up a corner of the flat .especially if your cutting the dove tails for the sights   .
Again though , very nice job on the dove tail

Offline 4-Liberty

  • TMA Forum Member
  • ***
  • Posts: 169
Re: Jacob Dickert Build Progress
« Reply #41 on: January 30, 2014, 01:42:36 AM »
Thanks Captchee! Yup, the saw skipped out while cutting the tabs off, but I lightly draw filed and sanded it and it came right out.
I will definitely use tape next time.
This was kind of a nerve-racking process, but I just took it slow and cut and filed a little at a time. Now I just have to inlet the tab into the barrel and repeat that two more times.

TallTexan: Yup, that be Dykem. If you look at the first few photos above you will see I have some lines scribed onto the barrel. I measured the dimensions of the tab that I was to inlet and transferred that to the barrel and as long as i saw and file within those lines, I'm good to go!
If you want to build a muzzleloader, I say just do it. I've always wanted to build one myself but I just kept putting it off. This is my first attempt, and I'm glad I made the step and decided to do it. I just wish I had done it earlier. I'm really enjoying myself with this project. I figured I'd take er slow and steady and when I finish, I finish. There is A LOT of help on here to get you through the process.
The guy in the video link below has a series of videos that he's made to show his progress of his Bucks County Pennsylvania Longrifle build. I'm a "visual learner" so it has helped me quite a bit.
If the link doesn't work, just Youtube search "Track of the Wolf" and it's the first video that comes up (and he has 18 updates and counting).
TMA Member #174

Offline TallTexan

  • TMA Forum Member
  • ***
  • Posts: 140
  • You can't kill a man who is born to hang.
Re: Jacob Dickert Build Progress
« Reply #42 on: January 30, 2014, 01:50:57 AM »
Though I probably possess the skill to complete a kit I don't have the space for it due to my current living arrangements.  Last time I cleaned my muzzle loaders on the back patio one of my crazy neighbors told the president of the home owners association that I was "firing guns off the back porch" so building a kit out there wouldn't be a good idea.  It's still on my bucket list though.
Member 629

Offline 4-Liberty

  • TMA Forum Member
  • ***
  • Posts: 169
Re: Jacob Dickert Build Progress
« Reply #43 on: January 30, 2014, 01:59:18 AM »
I hear ya on the lack of space situation. My little work room is so small that when the stock is in the vise I have about 4 inches of space between the wall and the end of the stock so it takes a little maneuvering to get to all of the areas that I need to work on. I have to be careful that I don't bang it on the walls when I reposition it. :Doh!
TMA Member #174

Offline 4-Liberty

  • TMA Forum Member
  • ***
  • Posts: 169
Re: Jacob Dickert Build Progress
« Reply #44 on: January 30, 2014, 10:49:42 AM »
Barrel tenon filed and polished.

Barrel tenon mortise.

My work shop.
TMA Member #174